PROJECT DETAILS SECTION
The Project Details section is a comprehensive information hub that provides annotators and reviewers with all the essential information they need to understand, participate in, and successfully complete annotation projects on the TagOn platform. This section serves as your primary reference point for project requirements, guidelines, progress tracking, and communication with project administrators.
1. Project Overview
The Project Details screen is the central location where you can access comprehensive information about any annotation project. This screen is accessible from multiple locations within the platform, including the project search results, your My Projects section, and direct project links.
Accessing Project Details
To view project details:
- Navigate to the project you want to learn more about
- Click on the "View Details" icon or button associated with the project
- The Project Details screen will open, displaying all available information about the project
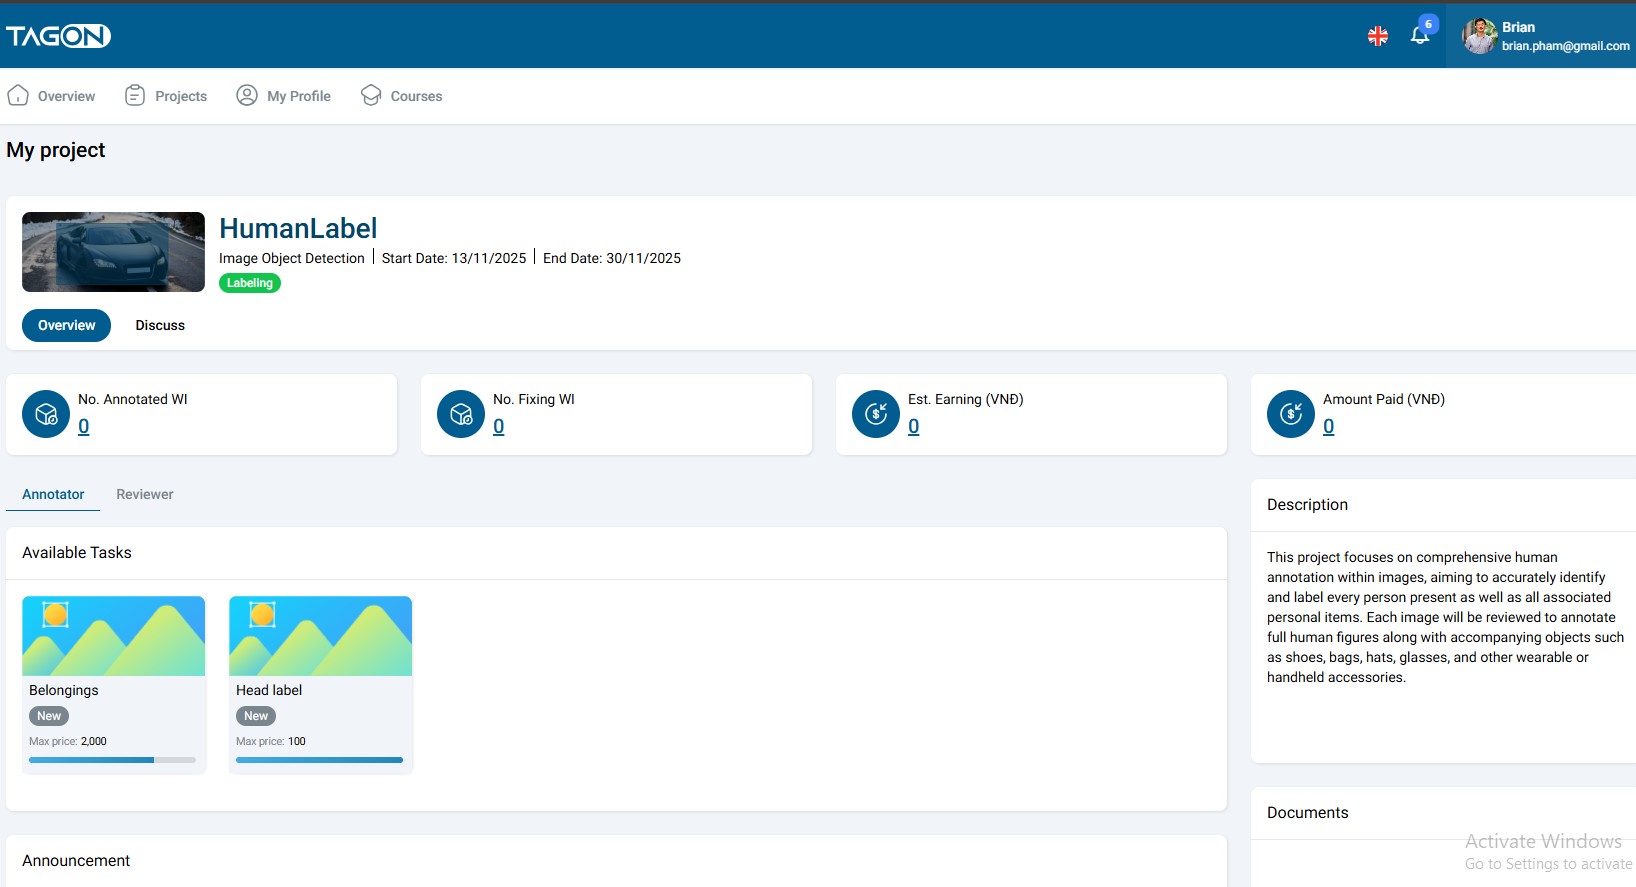
Information Available in Project Details
The Project Details screen provides a complete overview of the project, including:
Project Identification Information
- Project Name: The official title of the annotation project
- Project ID: Unique identifier for the project (useful for support inquiries)
- Project Type: The category of annotation work required
- Image annotation projects (classification, object detection, segmentation, etc.)
- Video annotation projects (action recognition, object tracking, etc.)
- Audio annotation projects (speech-to-text, audio classification, etc.)
- Text annotation projects (named entity recognition, sentiment analysis, etc.)
Project Timeline
- Start Date: When the project officially begins
- End Date: Project deadline or completion target
- Duration: Total time allocated for the project
- Current Phase: What stage the project is currently in
Participation Status
Your current status in relation to the project, which can be one of the following:
- Annotating: You are actively working on annotation tasks for this project
- Pending Review: Your annotations are being reviewed by project reviewers
- Not Registered: You have not yet registered for this project
- Waiting for Approval: You have registered but are awaiting project administrator approval
- Rejected: Your registration or test submission was not approved
Work Item (WI) Statistics
The Project Details screen displays comprehensive statistics about your work on the project:
- Number of WIs Annotated: Total work items you have successfully completed
- Number of WIs Under Revision: Work items currently being reviewed or requiring corrections
- Number of WIs Pending: Work items assigned to you but not yet started
- Completion Rate: Percentage of assigned work items you have completed
- Estimated Earnings: Projected income based on completed work items and project pricing
- Quality Score: Your average quality rating from reviewers (if applicable)
Project Documentation
- Project Description: Comprehensive overview of the project goals, objectives, and requirements
- Instruction Documents: Detailed guidelines, standards, and specifications for completing tasks
- Labeling Guidelines: Specific instructions for how to annotate different types of data
- Quality Standards: Criteria used to evaluate annotation quality
- Examples: Sample annotations showing correct and incorrect approaches
Communication and Updates
- Announcements from Project Administrator: Important updates, changes, or clarifications about the project
- FAQ Section: Frequently asked questions and answers about the project
- Contact Information: How to reach the project administrator for questions or support
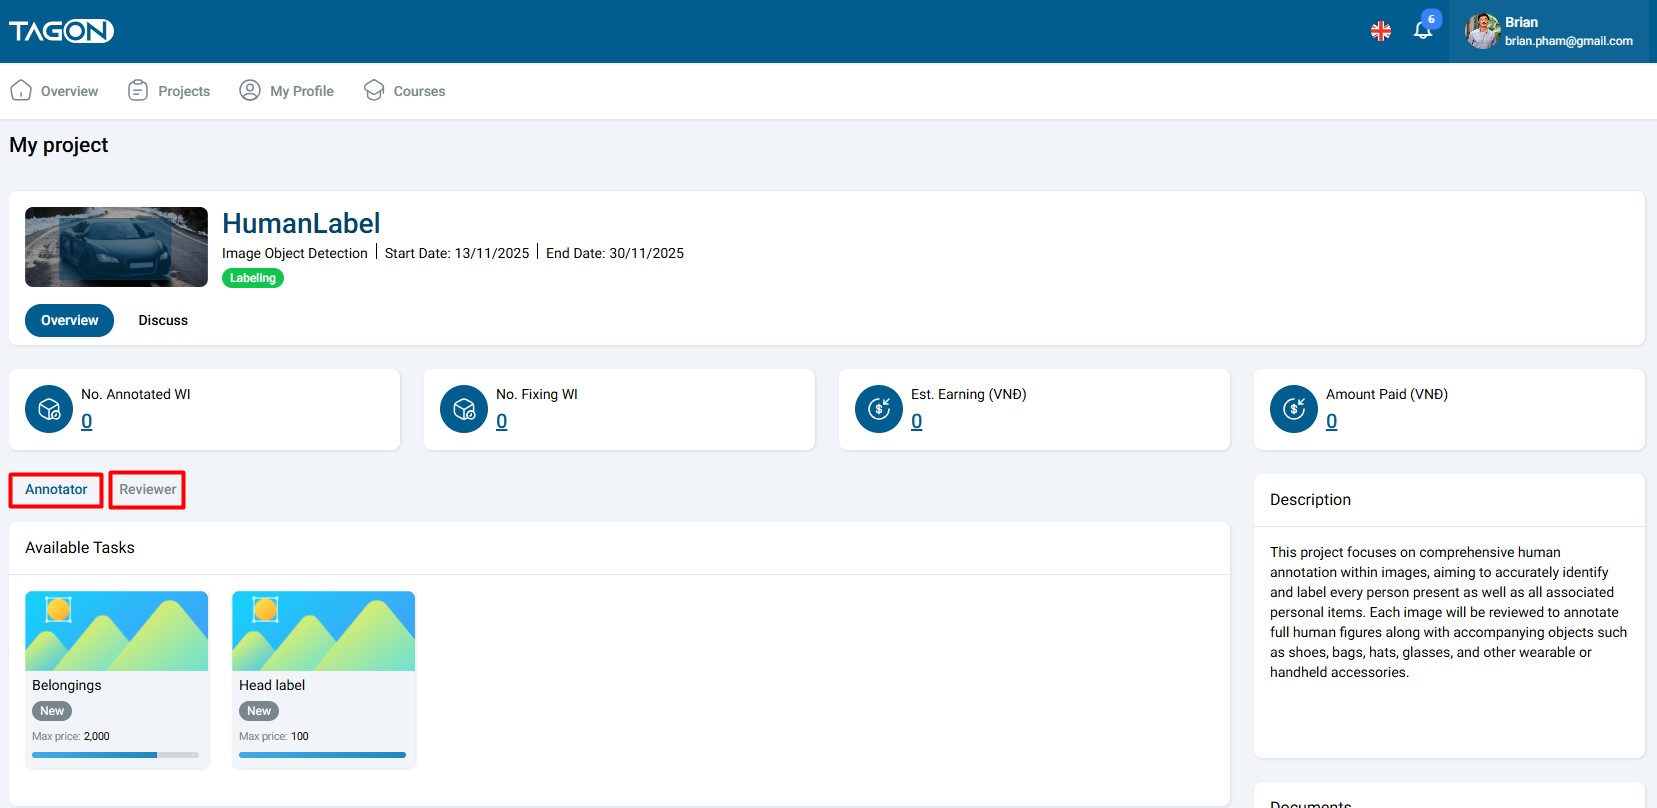
2. Roles in the Project
Each annotation project on the TagOn platform allows users to participate in two distinct roles, each with specific responsibilities and requirements. Understanding these roles is crucial for choosing the right position that matches your skills and interests.
Role Selection
When registering for a project or stage, you must choose which role you want to perform. Important considerations:
- You can only choose one role per project: You cannot be both an Annotator and Reviewer for the same project simultaneously
- Role selection is stage-specific: You may choose different roles for different stages within the same project
- Role requirements vary: Each role has different skill requirements and test criteria
- Role availability: Not all projects may have openings for both roles
• Annotator (Anno)
The Annotator role is the primary data labeling position in annotation projects.
Responsibilities
Annotators are responsible for:
- Data Labeling: Performing the actual annotation work according to project guidelines
- Quality Standards: Ensuring annotations meet the specified quality criteria
- Guideline Adherence: Following all instructions, standards, and best practices provided
- Task Completion: Completing assigned work items within specified deadlines
- Correction Implementation: Making necessary corrections based on reviewer feedback
Skills Required
Successful annotators typically possess:
- Attention to Detail: Ability to notice subtle differences and follow precise instructions
- Consistency: Maintaining uniform annotation standards throughout the project
- Time Management: Completing tasks efficiently while maintaining quality
- Technical Proficiency: Comfortable using annotation tools and software
- Domain Knowledge: Understanding of the subject matter being annotated (when applicable)
Workflow
The typical annotator workflow involves:
- Receiving assigned work items (WIs)
- Reviewing project guidelines and instructions
- Performing annotations according to specifications
- Reviewing own work for accuracy and completeness
- Submitting completed annotations
- Addressing any feedback or correction requests from reviewers
• Reviewer
The Reviewer role focuses on quality assurance and evaluation of annotation work.
Responsibilities
Reviewers are responsible for:
- Quality Evaluation: Checking annotations submitted by annotators for accuracy and completeness
- Guideline Compliance: Verifying that annotations follow project guidelines and standards
- Scoring and Rating: Assigning quality scores to annotation work
- Feedback Provision: Providing constructive feedback to annotators when corrections are needed
- Final Approval: Approving annotations that meet quality standards
Skills Required
Successful reviewers typically possess:
- Expert Knowledge: Deep understanding of annotation guidelines and quality standards
- Analytical Skills: Ability to identify errors, inconsistencies, and quality issues
- Fair Judgment: Objective evaluation of work based on established criteria
- Communication Skills: Ability to provide clear, constructive feedback
- Experience: Usually requires prior experience as an annotator or domain expertise
Workflow
The typical reviewer workflow involves:
- Receiving annotations submitted by annotators
- Reviewing annotations against project guidelines and standards
- Identifying any errors, inconsistencies, or quality issues
- Providing scores and feedback
- Approving acceptable work or requesting corrections
- Documenting patterns or recurring issues for project improvement
Choosing the Right Role
When deciding which role to pursue, consider:
- Your Experience Level: Annotator roles are typically more accessible to newcomers
- Your Skills: Reviewers usually need more experience or specialized knowledge
- Your Preferences: Do you prefer creating annotations or evaluating them?
- Project Requirements: Some projects may have specific requirements for each role
- Earning Potential: Different roles may have different compensation structures
Users may choose either role for each stage, depending on the requirements of that specific stage and their own skill set. You are not locked into one role across all projects or stages.
3. Project Stages
Projects on the TagOn platform are organized into stages, which provide a structured approach to managing complex annotation projects. Understanding the stage system is essential for effective project participation and management.
Stage Structure
Each project is divided into multiple stages, with each stage representing a distinct phase of the annotation work. This modular approach offers several advantages:
- Focused Work: Each stage concentrates on one specific type of task
- Clear Progression: Stages provide a clear path through the project
- Flexible Participation: Users can join stages that match their skills and availability
- Quality Control: Each stage can have its own quality standards and review process
Stage Characteristics
Single Task Focus
- Each stage has only one specific task, and this task does not change throughout the stage
- This focused approach ensures clarity and consistency in the work
- Examples of stage-specific tasks:
- Stage 1: Object detection in images
- Stage 2: Classification of detected objects
- Stage 3: Attribute labeling for classified objects
Independent Work Modules
Each stage functions as an independent work module with:
- Its Own Requirements: Specific guidelines and standards unique to that stage
- Its Own Documentation: Stage-specific instructions, examples, and reference materials
- Its Own Test(s): Separate qualification tests that must be passed to participate
- Its Own Timeline: Individual deadlines and milestones
- Its Own Quality Criteria: Stage-specific evaluation standards
Benefits of the Stage System
The stage-based structure provides several advantages:
- Skill Matching: Users can join stages that align with their expertise
- Progressive Learning: Users can start with simpler stages and progress to more complex ones
- Workload Management: Users can participate in multiple stages at their own pace
- Quality Assurance: Each stage can be optimized for specific quality requirements
- Flexible Scheduling: Users can join stages when they have time available
Stage Navigation
To work with stages:
- Access Project Details: Open the project you want to participate in
- View Available Stages: Review the list of stages within the project
- Select a Stage: Click on a stage to view its details and requirements
- Review Stage Information: Read descriptions, documents, and requirements
- Register for Stage: Complete tests and registration process if interested
- Begin Work: Start receiving work items after approval
Stage Progression
Understanding how stages relate to each other:
- Sequential Stages: Some projects require completing stages in order
- Parallel Stages: Some projects allow working on multiple stages simultaneously
- Prerequisites: Some stages may require completing previous stages first
- Independent Stages: Some stages can be completed independently of others
4. Stage Details
When you select a specific stage within a project, the system displays comprehensive information organized into several information tabs. Each tab provides different types of essential information to help you understand and successfully complete the stage.
Accessing Stage Details
To view stage details:
- Navigate to the Project Details screen
- Locate the Stages section
- Click on the stage you want to learn more about
- The stage details screen will open with multiple information tabs
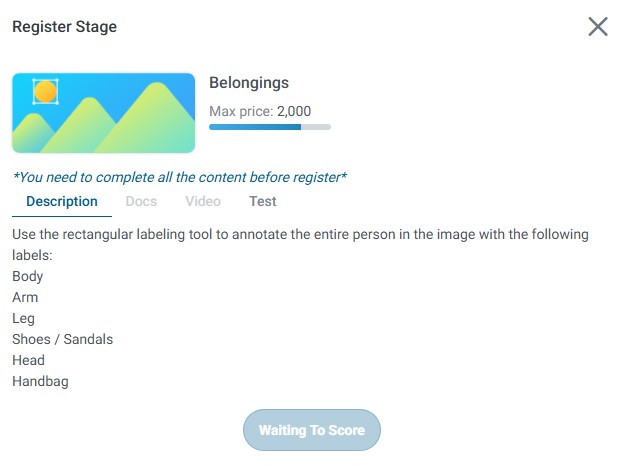
4.1. Description Tab
The Description tab provides a comprehensive overview of the stage and its requirements.
Information Included
- Task Overview: High-level description of what the stage requires
- Task Details: Specific instructions on how to perform the annotation work
- Label Categories: Complete list of all labels that can be used in this stage
- Annotation Rules: Rules and guidelines for applying labels and creating annotations
- Use Cases: Examples of when to use specific labels or techniques
- Common Scenarios: Typical situations you may encounter during annotation
- Edge Cases: Unusual situations and how to handle them
How to Use the Description Tab
- Read Thoroughly: Carefully read all description content before starting work
- Reference While Working: Keep the description tab open while annotating for quick reference
- Understand Context: Use the description to understand the purpose and goals of the stage
- Clarify Doubts: If anything is unclear, refer back to the description or contact the project administrator
4.2. Documents Tab
The Documents tab contains all the detailed documentation you need to successfully complete the stage.
Document Types
The Documents tab typically includes:
-
Detailed Annotation Guidelines: Comprehensive instructions covering all aspects of the annotation task
- Step-by-step procedures
- Decision trees for complex scenarios
- Best practices and tips
- Common mistakes to avoid
-
Labeling Standards: Specific standards and criteria for each label type
- Definition of each label
- When to use each label
- When not to use each label
- Label relationships and hierarchies
-
Examples of Correct Annotations: Visual or textual examples showing proper annotation techniques
- Sample work items with correct annotations
- Explanations of why annotations are correct
- Key features to replicate
-
Examples of Incorrect Annotations: Examples of common mistakes and how to avoid them
- Sample work items with incorrect annotations
- Explanations of what makes them incorrect
- How to correct the mistakes
-
Reference Materials: Additional resources that may be helpful
- Terminology glossaries
- Domain-specific knowledge
- Technical specifications
How to Use the Documents Tab
- Download Materials: Download documents for offline reference if needed
- Study Before Starting: Review all documents thoroughly before beginning annotation work
- Regular Reference: Refer back to documents when encountering unfamiliar situations
- Compare Examples: Use correct and incorrect examples to guide your work
- Bookmark Important Sections: Mark frequently referenced sections for quick access
4.3. Video Tab
The Video tab provides instructional videos to help you understand the task more easily.
Video Content
Instructional videos typically cover:
- Task Overview: Introduction to the stage and its objectives
- Tool Tutorials: How to use annotation tools and features
- Step-by-Step Guides: Walkthroughs of the annotation process
- Example Annotations: Video demonstrations of annotating sample work items
- Common Mistakes: Visual examples of errors and how to avoid them
- Best Practices: Tips and techniques for efficient and accurate annotation
Benefits of Video Instructions
- Visual Learning: Some concepts are easier to understand when demonstrated visually
- Tool Familiarization: Videos help you learn how to use annotation tools effectively
- Consistency: Videos ensure all annotators see the same instructions
- Review Capability: You can rewatch videos as many times as needed
How to Use the Video Tab
- Watch Before Starting: View all relevant videos before beginning work
- Take Notes: Note important points or techniques shown in videos
- Rewatch as Needed: Revisit videos when you encounter similar situations
- Follow Along: Practice the techniques shown in videos on sample data
- Share with Team: Discuss video content with other annotators if working in a team
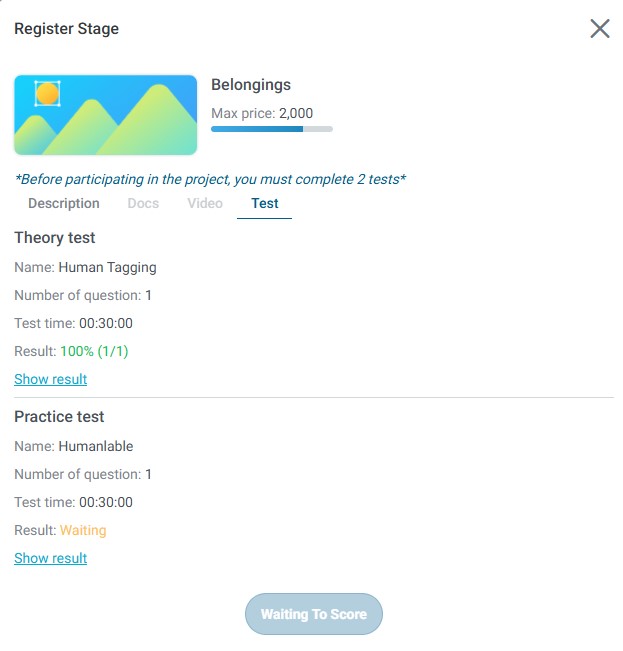
4.4. Tests Tab
The Tests tab is where you access and complete the qualification tests required to register for a stage.
Test Requirements
To register for a stage, users must complete two required tests:
- Theory Test: Evaluates your understanding of project guidelines, rules, and concepts
- Practical Test: Evaluates your ability to apply knowledge and create accurate annotations
Theory Test
The theory test assesses:
- Guideline Comprehension: Your understanding of project guidelines and instructions
- Rule Knowledge: Your knowledge of annotation rules and standards
- Conceptual Understanding: Your grasp of key concepts and terminology
- Decision Making: Your ability to make correct decisions based on guidelines
Theory Test Characteristics:
- Usually consists of multiple-choice questions
- May include true/false questions
- May require selecting correct examples from options
- Typically has a passing score requirement
- May have a time limit
Practical Test
The practical test assesses:
- Annotation Skills: Your ability to create accurate annotations
- Tool Proficiency: Your skill in using annotation tools
- Quality Standards: Your ability to meet quality requirements
- Guideline Application: Your ability to apply guidelines to real work items
Practical Test Characteristics:
- Requires you to annotate actual work items
- Evaluates accuracy, completeness, and adherence to guidelines
- May include multiple work items to annotate
- Scored based on quality and correctness
- Typically has a passing score requirement
Test Process
The complete test process involves:
- Accessing Tests: Navigate to the Tests tab for the stage you want to register for
- Reviewing Prerequisites: Ensure you have read all descriptions, documents, and watched videos
- Completing Theory Test: Answer all theory test questions accurately
- Completing Practical Test: Annotate all practical test work items according to guidelines
- Submitting Tests: Submit both tests for evaluation
- Waiting for Results: Wait for the project administrator to evaluate your tests
- Receiving Feedback: Get notified of approval, rejection, or revision requirements
Test Scoring and Approval
- Passing Requirements: Both tests must be passed to be eligible for the stage
- Scoring Criteria: Tests are scored based on accuracy, completeness, and guideline adherence
- Evaluation Time: Test evaluation typically takes a few days
- Notification: You will receive email notification of test results
- Retake Options: Some projects may allow retaking tests if initial attempts don't meet requirements
Tips for Test Success
To maximize your chances of passing tests:
- Thorough Preparation: Read all descriptions, documents, and watch all videos
- Take Your Time: Don't rush through tests—accuracy is more important than speed
- Follow Guidelines: Strictly adhere to all guidelines and instructions
- Review Your Work: Double-check your answers and annotations before submitting
- Ask Questions: Contact the project administrator if anything is unclear
- Practice First: Use sample data to practice before taking the actual test
Only users who pass both tests are eligible to join the stage and begin receiving work items.
5. Stage Registration Process
The stage registration process is the formal procedure you must complete to participate in a specific stage of a project. This process ensures that only qualified annotators and reviewers who understand the requirements can work on the stage.
Prerequisites for Registration
Before beginning the registration process, ensure you have:
- Active Account: A valid TagOn account in good standing
- Required Skills: The necessary skills and knowledge for the stage
- Time Availability: Sufficient time to complete tests and work on the stage
- Understanding: Basic understanding of the project and stage requirements
Step-by-Step Registration Process
Follow these steps to register for a stage:
Step 1: Open the Desired Stage
- Navigate to the Project Details screen for the project you want to join
- Locate the Stages section
- Click on the stage you want to register for
- The stage details screen will open with all available information tabs
Step 2: Select Your Role
- Review the available roles for the stage (Annotator or Reviewer)
- Consider which role matches your skills and interests
- Select your desired role: Annotator or Reviewer
- Note that role selection may affect test requirements and work assignments
Role Selection Considerations:
- Review role requirements and responsibilities
- Consider your experience level and skills
- Think about your preferences (creating vs. evaluating annotations)
- Check if both roles are available for the stage
Step 3: Review the Description, Documents, and Instructional Videos
Before taking tests, thoroughly review all available information:
- Read the Description Tab: Understand the task overview, requirements, and rules
- Study the Documents Tab: Review all guidelines, standards, and examples
- Watch the Video Tab: View all instructional videos to understand the process
- Take Notes: Document important points, rules, and techniques
- Clarify Doubts: Contact the project administrator if anything is unclear
Why This Step is Critical:
- Tests are based on the information in these tabs
- Understanding requirements improves test performance
- Familiarity with guidelines helps you work more efficiently later
- Reduces the need for corrections and revisions
Step 4: Complete the Theory Test
- Navigate to the Tests tab
- Click on "Start Theory Test" or similar button
- Read each question carefully
- Answer all questions based on your understanding of the guidelines
- Review your answers before submitting
- Submit the theory test
Theory Test Tips:
- Take your time—there's usually no benefit to rushing
- Refer back to documents if allowed
- Answer based on guidelines, not assumptions
- Double-check your answers before submitting
Step 5: Complete the Practical Test
- After completing the theory test, proceed to the practical test
- Click on "Start Practical Test" or similar button
- Review the work items you need to annotate
- Annotate each work item according to the guidelines
- Review your annotations for accuracy and completeness
- Submit the practical test
Practical Test Tips:
- Follow guidelines exactly as specified
- Take your time to ensure accuracy
- Review your annotations before submitting
- Ensure all required elements are included
- Check for common mistakes mentioned in documents
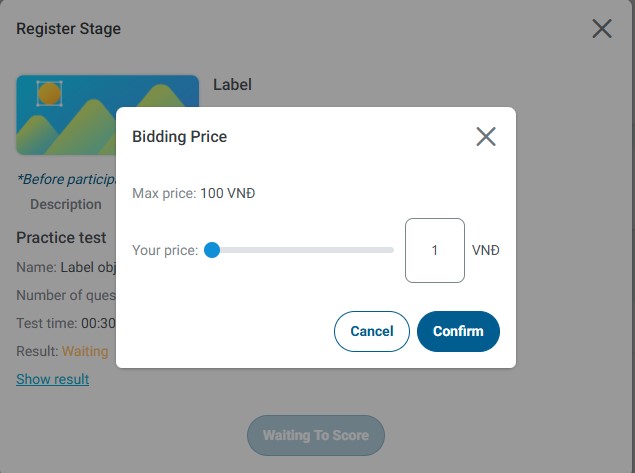
Step 6: Enter Your Proposed Price (if Required)
Some projects require you to submit a bid price along with your test results:
- Review the project's pricing structure and requirements
- Consider your skills, experience, and the work involved
- Enter your proposed price per work item or per hour
- Ensure your price is competitive but sustainable
- Submit your bid along with test results
Pricing Considerations:
- Research typical rates for similar projects
- Consider the complexity and time required
- Factor in your experience level
- Balance competitiveness with fair compensation
- Don't bid too low—unsustainable rates hurt everyone
Step 7: Wait for System Evaluation
After submitting your tests and bid (if required):
- Your submission will be sent to the project administrator for evaluation
- The evaluation process typically takes a few days
- You will receive an email notification when evaluation is complete
- Check your email regularly for updates
During the Waiting Period:
- Continue working on other approved projects
- Check your Registered Projects section for status updates
- Be patient—evaluation takes time
- Prepare to address any feedback if revision is requested
Registration Outcomes
After evaluation, you will receive one of the following outcomes:
Approval
- Status: Your registration is approved
- Next Steps: The stage will appear in your Ongoing Projects section
- Action: You can begin receiving and working on work items immediately
- Notification: You will receive an email confirmation
Rejection
- Status: Your registration is not approved
- Reason: Test results didn't meet requirements or bid was not competitive
- Next Steps: Review feedback and consider applying to other stages
- Action: You can view test results and feedback to improve for future applications
- Notification: You will receive an email with rejection details
Revision Required
- Status: Your tests need improvement but you're given another chance
- Reason: Test results were close to passing but need improvement
- Next Steps: Review feedback and retake the test
- Action: Use the "Redo Test" option to retake the test
- Notification: You will receive an email with revision request and feedback
Post-Registration
Once successfully registered for a stage:
- Access Work Items: Begin receiving work items assigned to you
- Start Working: Use your knowledge from tests and guidelines to complete annotations
- Maintain Quality: Continue following guidelines to maintain approval status
- Track Progress: Monitor your statistics and earnings in Project Details
- Stay Updated: Check for announcements and updates from project administrators
Users can begin receiving WI (Work Item) tasks only after successfully completing all tests and being approved for the stage. Do not expect to receive work items until you have completed the registration process and received approval.
Best Practices for Registration
To maximize your chances of successful registration:
- Prepare Thoroughly: Spend adequate time reviewing all materials before testing
- Take Tests Seriously: Treat tests as important evaluations of your readiness
- Follow Guidelines: Strictly adhere to all guidelines in your test submissions
- Submit Quality Work: Ensure your practical test annotations are accurate and complete
- Competitive Bidding: Submit fair and competitive prices if bidding is required
- Be Patient: Allow adequate time for evaluation and don't rush the process
- Learn from Feedback: Use any feedback to improve for future registrations