Annotator waiting approval
This guide provides comprehensive instructions on how to view, evaluate, and approve annotators who have completed their qualification tests and are waiting for your evaluation. Managing annotator approvals effectively ensures you have qualified team members working on your projects.
When annotators register for your project, they must complete qualification tests to demonstrate their skills and understanding of your project requirements. After completing these tests, annotators appear in the "Annotator Waiting for Approval" list, where you can review their work and decide whether to approve or reject them for the project.
Key Points:
- Annotators must complete tests before appearing in the approval queue
- You can review their test submissions and automatic evaluation results
- You have full control over who gets approved for your project
- Providing feedback helps annotators improve and understand your standards
To view and manage annotators waiting for approval, follow these steps:
- Go to your Projects page or dashboard
- Locate the project that needs annotator evaluation
- Select the project that requires approval review
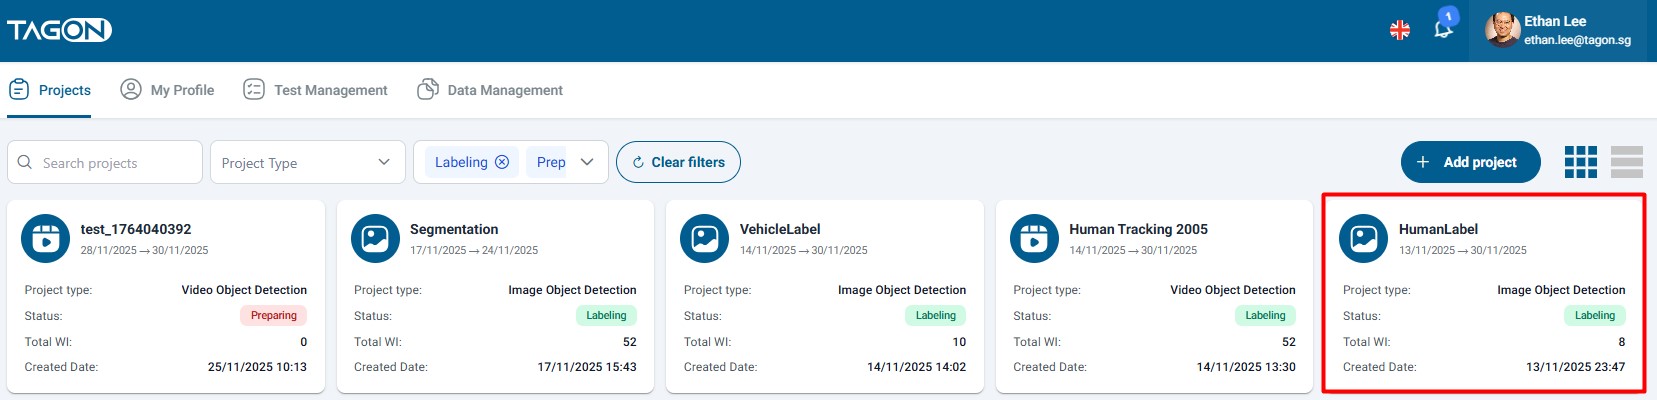
Make sure you select the correct project. Each project has its own list of annotators waiting for approval, and test results are project-specific.
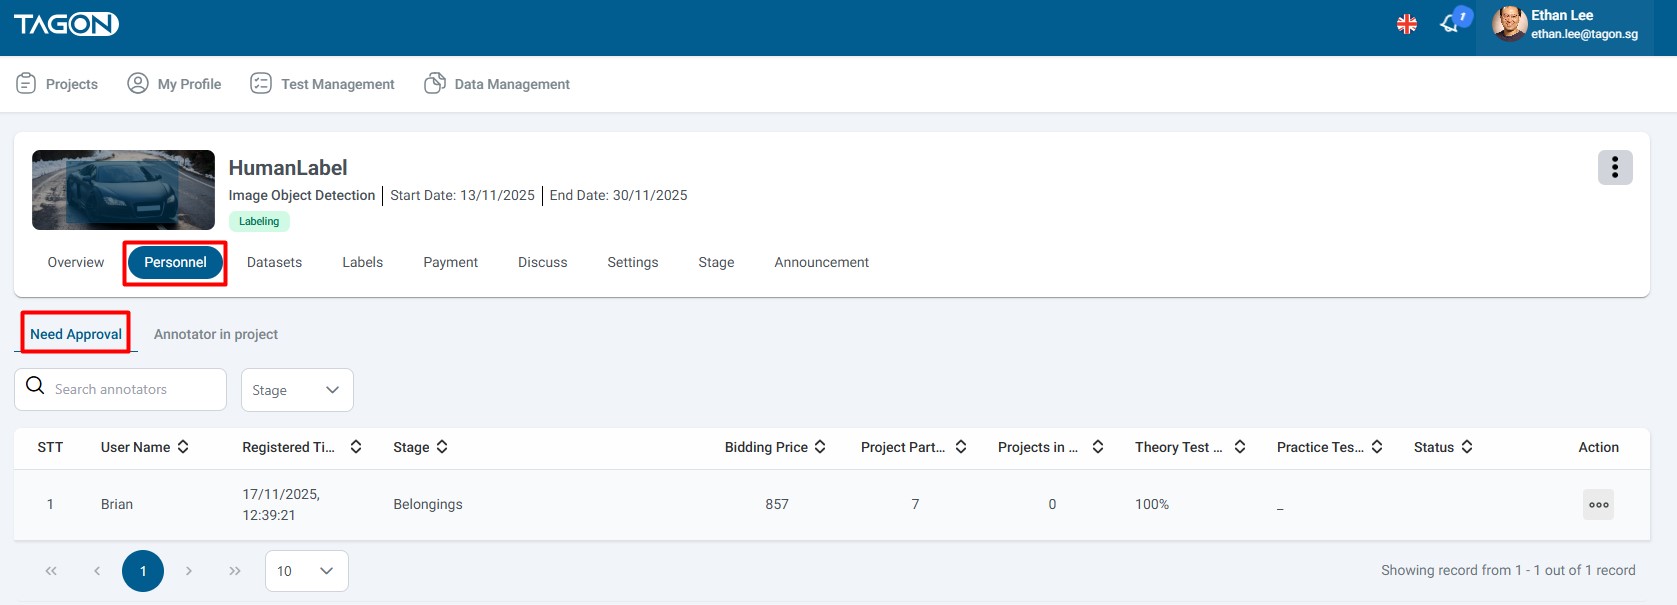
- Once in the project, navigate to the Personnel section or tab
- This section contains all personnel-related information for the project
- Look for the Need Approval option or link
- Click on Need Approval
- The system will display a list of all annotators who have:
- Completed the qualification test
- Submitted their test for evaluation
- Not yet been approved or rejected
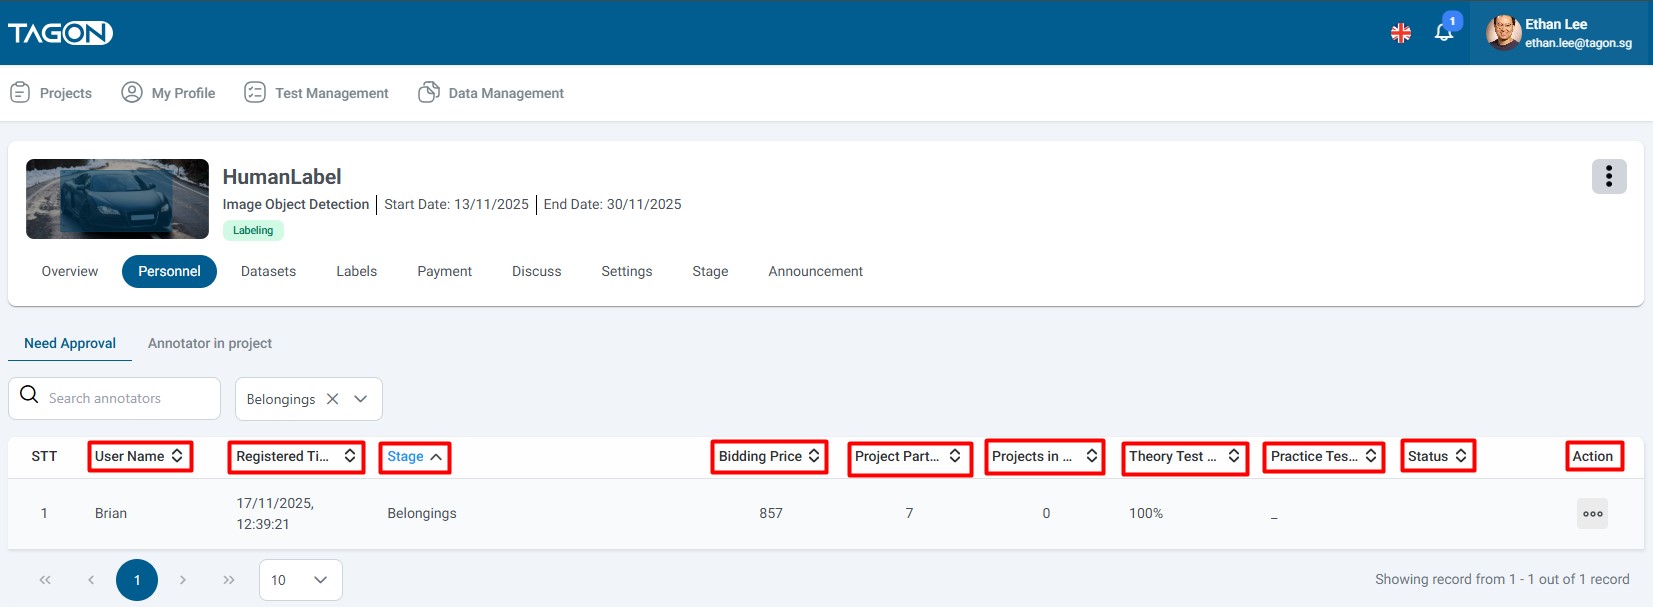
The approval list displays comprehensive information about each annotator to help you make informed decisions. Here's what each field means:
| STT | Field Name | Content Description |
|---|---|---|
| 1 | STT | Sequence number of the annotator in the list. This helps you track and reference specific annotators during review. |
| 2 | Full Name | The complete name of the annotator. This is their registered name on the platform. |
| 3 | Registration Time | The exact date and time when the annotator registered for your project. This helps you understand how long they've been waiting for approval. |
| 4 | Registration Price | The price per work item (sentence, image, etc.) that the annotator registered for. This shows their proposed rate for the project. |
| 5 | Projects Participating | The total number of projects the annotator is currently participating in. This indicates their experience level and availability. |
| 6 | Projects Completed | The number of projects the annotator has successfully completed. This demonstrates their track record and reliability. |
| 7 | Automatic Evaluation Result | The percentage score achieved in the annotator's test evaluation. This is calculated automatically by the system based on test answers. |
| 8 | Action to View Test | An icon or button that allows you to view the annotator's complete test submission. Click this to review their work in detail. |
Registration Price:
- Shows the annotator's proposed rate
- Compare with your project budget and other annotators' rates
- Consider quality vs. cost when making decisions
Projects Participating/Completed:
- High participation: May indicate experience but also potential workload
- High completion: Shows reliability and commitment
- Low numbers: Could be new annotators or those with limited availability
Automatic Evaluation Result:
- System-calculated score based on test answers
- Higher scores generally indicate better understanding
- Use as a reference, but always review actual test work
- Consider this alongside manual review of test submissions
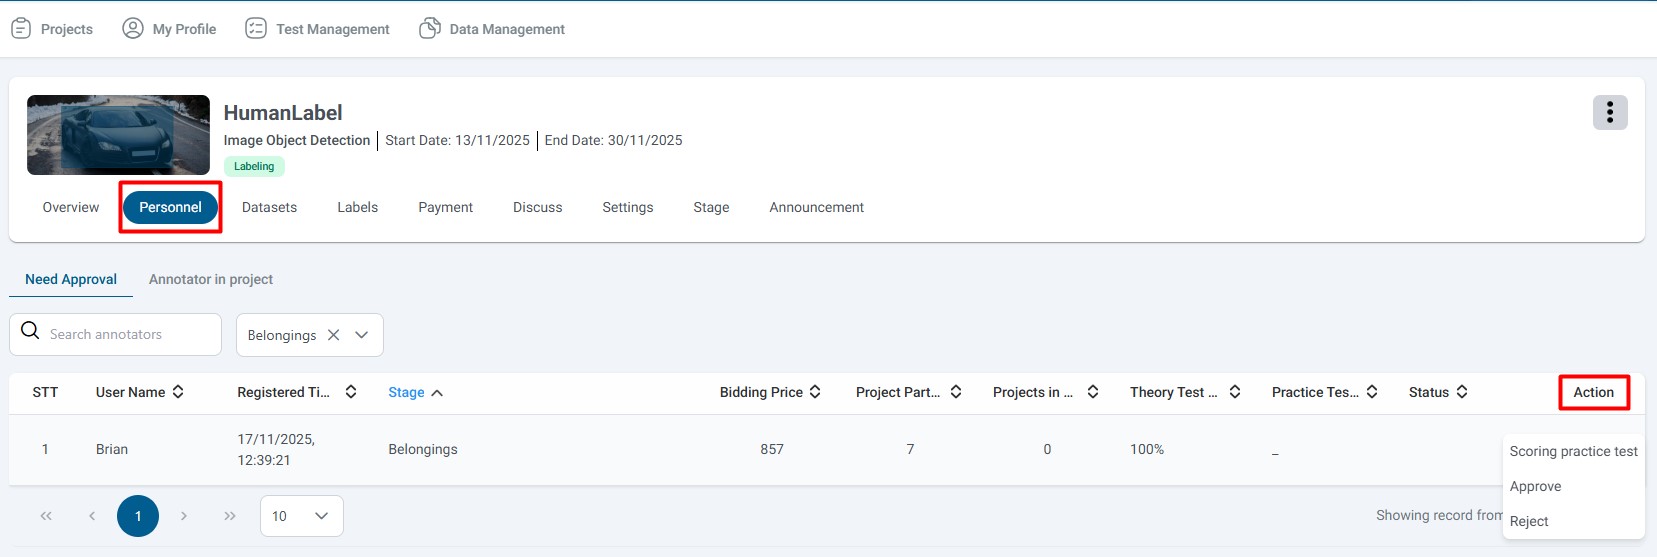
The evaluation process allows you to review the annotator's test submission and make an informed decision about their approval.
- In the Annotator Waiting for Approval screen, locate the annotator you want to evaluate
- Find the Action column in the table
- Click on the View Test icon or button under the Action column
Evaluation Guidelines:
- Review Thoroughly: Examine all aspects of the test submission
- Compare with Standards: Evaluate against your project's quality standards
- Check Consistency: Look for consistent application of guidelines
- Identify Strengths: Note what the annotator did well
- Identify Weaknesses: Note areas that need improvement
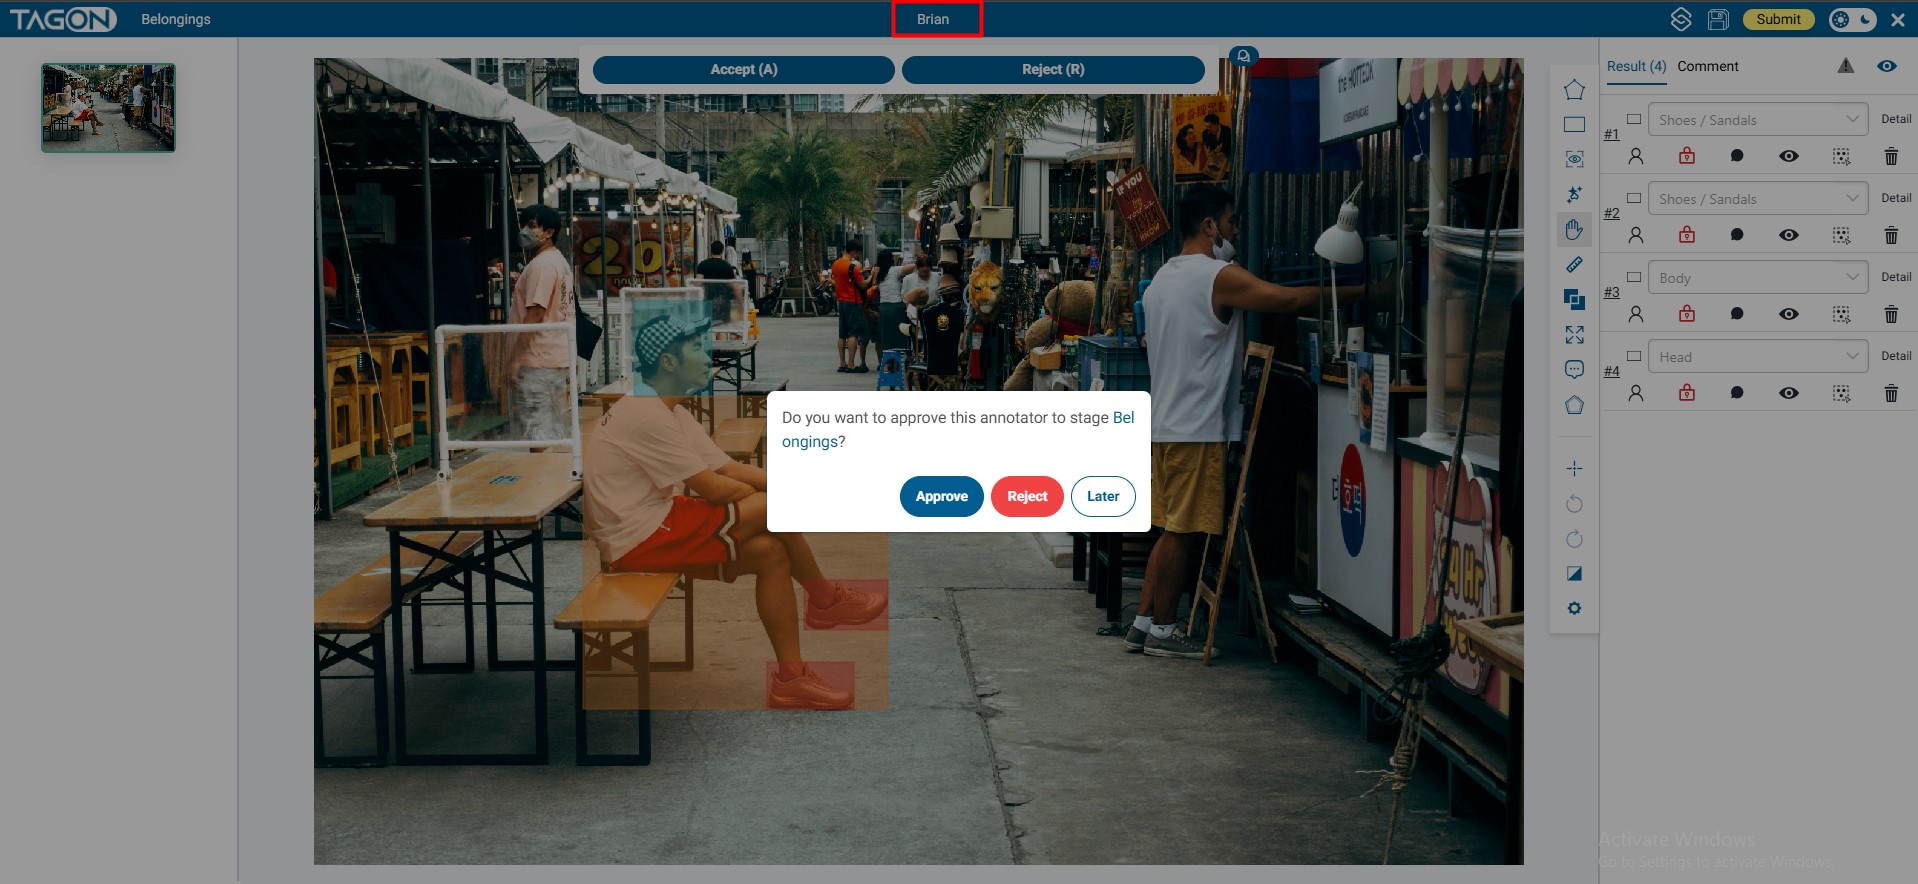
After reviewing the test, you have two main options:
If you agree with the annotator's work and they meet your standards:
-
Click Accept [1] button
- This indicates you approve of their test performance
- The annotator will be notified of acceptance
-
Add Comments (Optional):
- If you want to provide feedback, click the comment icon [3]
- Enter any comments, suggestions, or notes for the annotator
- Comments help annotators understand your expectations
-
Submit Your Evaluation:
- Click Submit to finalize your decision
- The annotator will be approved for the project
- They will receive notification of approval
If you do not accept the annotator's work or they don't meet your standards:
-
Click Reject [2] button
- This indicates the test does not meet requirements
- The annotator will be notified of rejection
-
Add Comments (Recommended):
- Click the comment icon [3] to provide feedback
- Explain why the test was rejected
- Provide constructive feedback to help them improve
- This helps annotators understand what went wrong
-
Submit Your Evaluation:
- Click Submit to finalize your decision
- The annotator will be rejected for the project
- They will receive notification with your feedback

If you want to immediately approve or reject the annotator for the project without reviewing the test in detail:
- Click on the Annotator's Name [4] in the list
- This will display their detailed profile and information
- From the detail page, you can:
- View their complete profile
- See their work history
- Approve or reject directly
- Access additional management options
Following these best practices will help you build a strong team of annotators:
- Quality First: Prioritize quality over speed or cost
- Consistency: Look for consistent application of guidelines
- Attention to Detail: Check for thoroughness and accuracy
- Understanding: Ensure annotators understand project requirements
- Communication: Consider their ability to follow instructions
- Be Constructive: Provide helpful, actionable feedback
- Be Specific: Point out specific issues or strengths
- Be Encouraging: Acknowledge good work even when rejecting
- Set Expectations: Clearly communicate what you're looking for
- Review Multiple Factors: Consider test score, experience, and actual work quality
- Don't Rush: Take time to thoroughly review each submission
- Be Fair: Apply consistent standards to all annotators
- Document Decisions: Keep notes on why you approved or rejected
- Regular Reviews: Check the approval queue regularly
- Prioritize: Review annotators who registered first
- Batch Processing: Evaluate multiple annotators in one session
- Follow Up: Monitor approved annotators' performance
Possible Causes:
- No annotators have completed tests yet
- Insufficient permissions
- Wrong project selected
Solutions:
- Verify you're in the correct project
- Check if any annotators have completed tests
- Contact support if the option should be visible
Possible Causes:
- Test not yet submitted
- Technical issues
- Permission problems
Solutions:
- Refresh the page
- Try clicking the action icon again
- Check your internet connection
- Contact support if problem persists
Possible Causes:
- Form not completed
- Network issues
- Browser problems
Solutions:
- Ensure you've selected Accept or Reject
- Check your internet connection
- Try refreshing the page
- Use a different browser if needed
Quick Checklist for Annotator Approval:
- Navigate to project → Personnel → Annotator Waiting for Approval
- Review annotator information and metrics
- Click action icon to view test submission
- Evaluate test against project standards
- Select Accept or Reject
- Add comments if needed
- Click Submit to finalize decision
Key Reminders:
- Always review actual test work, not just automatic scores
- Provide constructive feedback to help annotators improve
- Use Submit without Accept/Reject if you want annotators to redo tests
- Regular evaluation helps maintain project quality
Remember: Building a strong team of qualified annotators is essential for project success. Take time to evaluate carefully and provide helpful feedback.