Create a New Project
This guide will walk you through the process of creating a new labeling project in the system. Creating a well-configured project is essential for ensuring high-quality data annotation results and efficient workflow management.
Overview
The project creation process allows you to set up a comprehensive data labeling task with customizable parameters, quality controls, and workflow configurations. Before creating a project, ensure you have all necessary information ready, including project specifications, labeling guidelines, budget considerations, and timeline requirements.
Accessing the Project Creation Interface
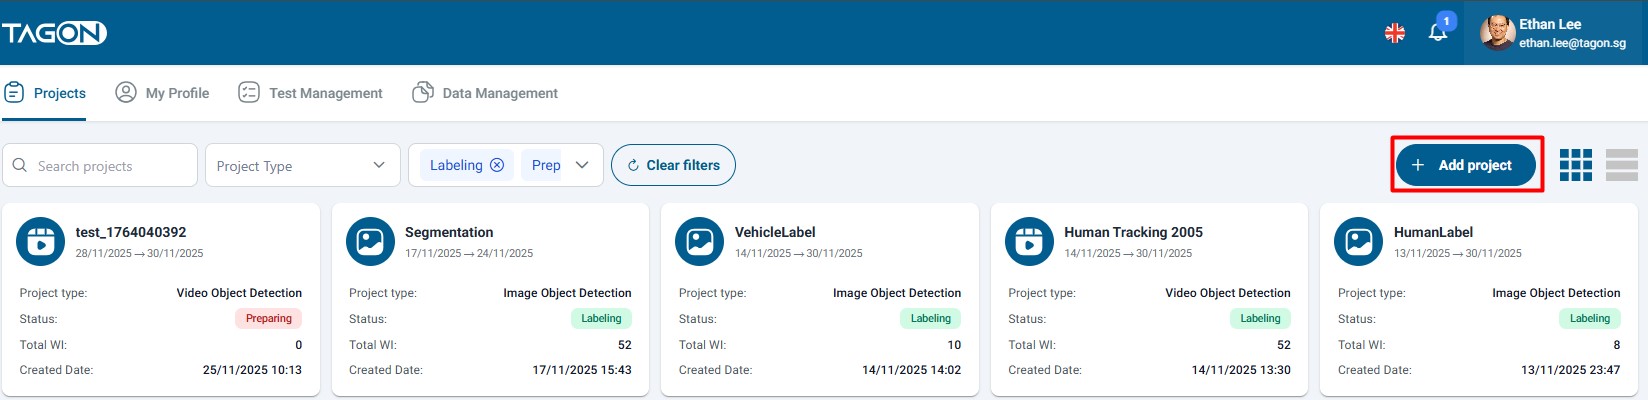
On the Project List screen, you can view all your existing projects and access the project creation functionality.
Step-by-Step Guide
Step 1: Initiate Project Creation
Navigate to the Project List screen and locate the Add Project button, typically positioned prominently at the top of the interface. Clicking this button will open the Create New Project dialog, which provides a comprehensive form for configuring your new labeling project.
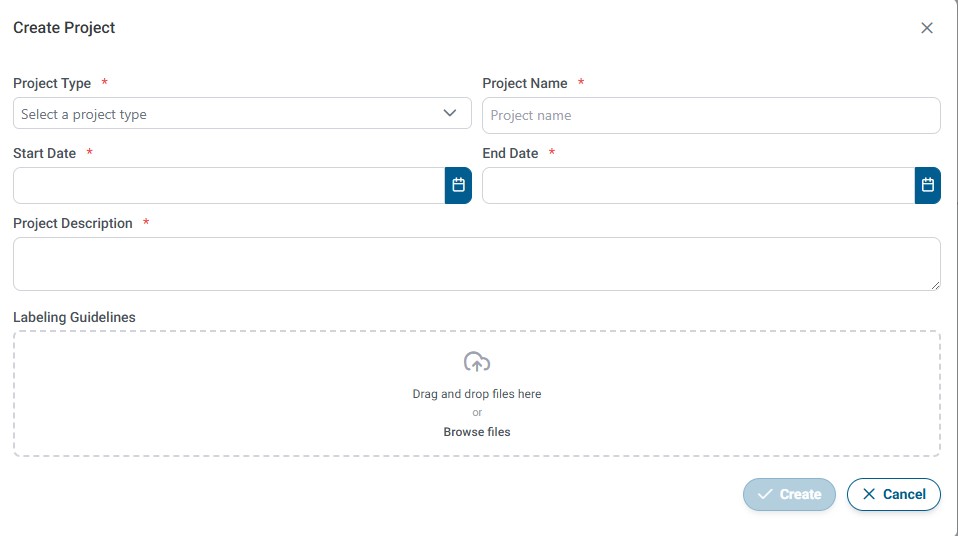
Step 2: Configure Project Details
In the Create New Project dialog, you'll need to fill in all required information. Each field plays a crucial role in defining how your project will operate and how annotators will interact with your data. Below is a detailed explanation of each configuration option:
Project Type
Select the appropriate project type that matches your data labeling requirements. The project type determines the available annotation tools and workflow options:
-
Image Project:
- Use this type for tasks involving visual data annotation
- Supports various annotation tasks including:
- Image Classification: Categorizing images into predefined classes or categories
- Character Recognition: Identifying and extracting characters from images
- Text Recognition: Extracting and transcribing text content from images (OCR tasks)
- Object Labeling: Drawing bounding boxes, polygons, or segmentation masks around objects in images
- Ideal for computer vision, document processing, and image analysis projects
-
Audio Project:
- Use this type for tasks involving audio data
- Supports Speech to Text transcription tasks
- Ideal for voice recognition, transcription services, and audio content analysis projects
-
Video Tracking Project:
- Purpose-built for frame-by-frame object tracking and temporal segmentation tasks
- Ideal for autonomous driving datasets, retail analytics, sports analysis, or any scenario that requires consistent object IDs across frames
- Supports multi-object tracking, polygon/box refinement per frame, and reviewer workflows tuned for sequence data
Best Practice: Choose the project type carefully, as this cannot be changed after project creation. Ensure the selected type aligns with your primary annotation task.
Project Name
Enter a clear, descriptive name for your project. This name will be visible to annotators and will help you identify the project in your project list.
- Use a name that clearly describes the project's purpose
- Keep it concise but informative (recommended: 50-100 characters)
- Avoid special characters that might cause issues in the system
- Example: "Street Sign Recognition - Urban Dataset" or "Medical Report Transcription - Phase 1"
Project Description
Provide a comprehensive description of your project that explains:
- The overall goal and purpose of the labeling task
- The context and background information
- Any specific requirements or constraints
- The intended use of the labeled data
A well-written description helps annotators understand the project context and produce higher quality results. Include relevant details about the data domain, labeling objectives, and any industry-specific terminology.
Start Date
Select the date when your project will become active and available for annotators to begin working on. This date determines when:
- The project becomes visible to annotators
- Work items become available for assignment
- The project timeline officially begins
Note: Ensure your project is fully configured and ready before setting the start date, as annotators may begin work immediately upon activation.
End Date
Set the deadline for project completion. This date represents:
- The final date by which all work items should be completed
- The cutoff point for accepting new work submissions
- The target completion date for your project timeline
Best Practice: Set a realistic end date that accounts for:
- The total number of work items
- Expected annotator availability
- Quality review and revision cycles
- Buffer time for unexpected delays
Labeling Instructions
Upload a comprehensive document containing detailed instructions for your labeling task. This is one of the most important components for ensuring quality results.
Supported File Formats:
- PDF (*.pdf): Recommended for formatted documents with images
- **Word Documents (.doc, .docx): Good for editable instructions
- Text Files (*.txt): Simple format for text-only instructions
Upload Methods:
- Click the upload button and browse for your file
- Drag and drop the file directly into the upload area
What to Include in Labeling Instructions:
- Project Overview: Context and purpose of the labeling task
- Labeling Guidelines: Step-by-step instructions for each annotation type
- Examples: Visual or textual examples of correct and incorrect annotations
- Edge Cases: How to handle ambiguous or unusual cases
- Quality Standards: What constitutes acceptable vs. unacceptable work
- Common Mistakes: Examples of errors to avoid
- Terminology: Definitions of domain-specific terms
- Tools Usage: How to use annotation tools effectively
Best Practice:
- Write clear, unambiguous instructions
- Include visual examples when possible
- Update instructions based on annotator questions
- Keep instructions concise but comprehensive
- Test your instructions with a sample annotator before full deployment
Step 3: Save or Cancel
After entering all required information, you have two options:
Save the Project
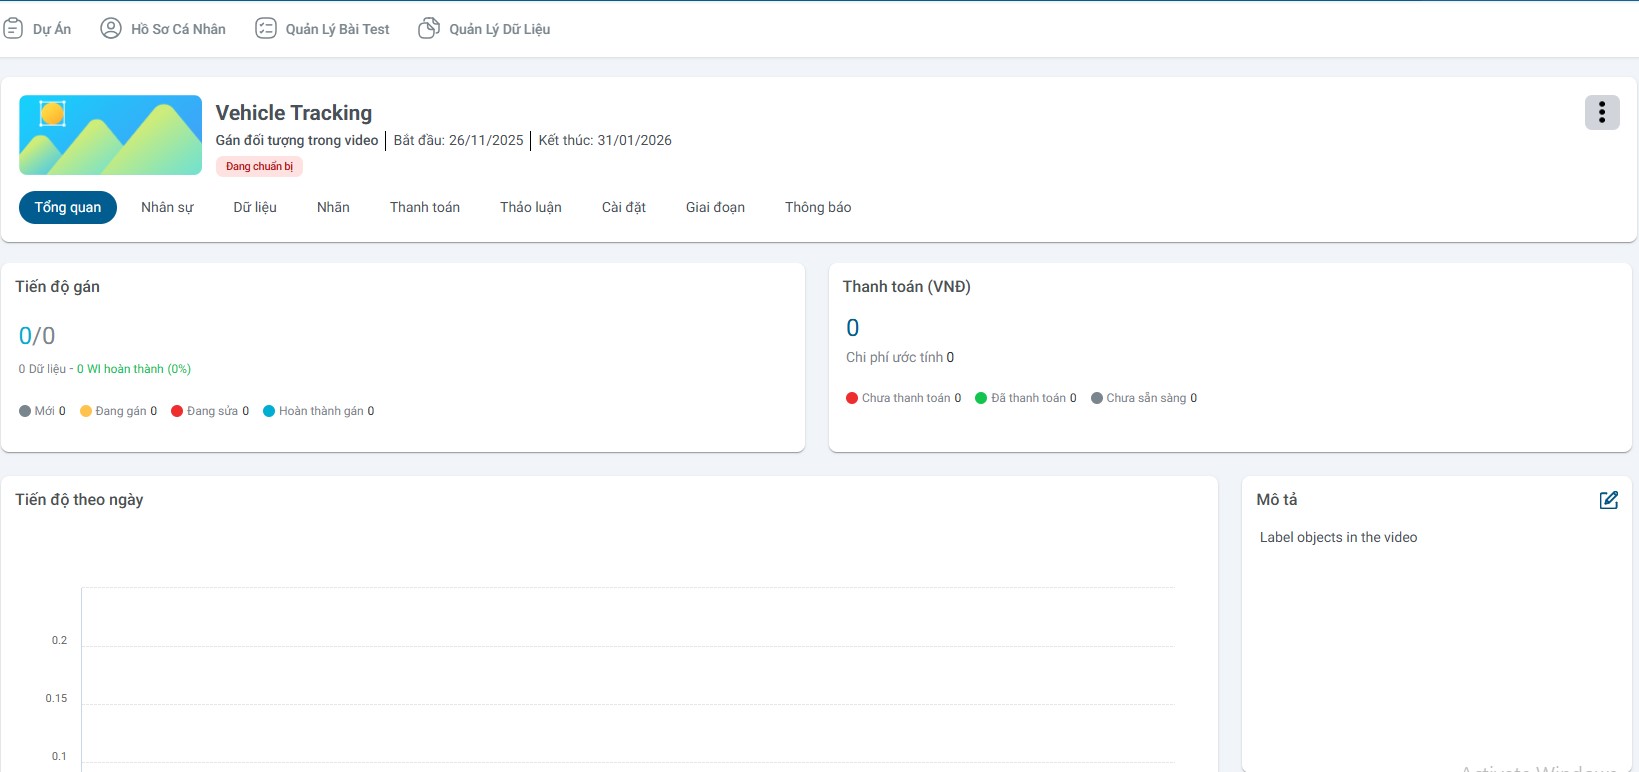
Click the Save button to create your new project. The system will:
- Validate all entered information
- Create the project with your specified configurations
- Display a success confirmation dialog
- Provide an option to view Project Details
After Saving:
- Click Project Details in the confirmation dialog to immediately view and configure additional project settings
- The project will appear in your Project List
- You can begin uploading data and assigning work items
- The project will become active on the specified Start Date
Next Steps After Project Creation:
- Upload your data files
- Configure additional project settings if needed
- Review and finalize labeling instructions
- Set up quality control parameters
- Begin assigning work to annotators
Cancel the Process
Click the Cancel button to exit the project creation dialog without saving. This action will:
- Discard all entered information
- Return you to the Project List screen
- Not create any project or save any data
Note: Any information entered in the form will be lost when canceling. Consider saving a draft of your project configuration if you need to reference it later.
Additional Tips and Best Practices
Before Creating a Project
- Prepare Your Data: Ensure your data files are ready and properly formatted
- Write Clear Instructions: Develop comprehensive labeling guidelines
- Define Quality Metrics: Establish clear quality standards and evaluation criteria
- Plan Your Budget: Calculate costs based on work item count and pricing
- Set Realistic Timelines: Account for annotation time, review cycles, and revisions
After Creating a Project
- Review Project Settings: Double-check all configurations before activation
- Test with Sample Data: Upload a small test batch to verify everything works
- Monitor Progress: Regularly check project metrics and annotator performance
- Provide Feedback: Communicate with annotators to improve quality
- Adjust Settings: Modify configurations based on project performance data
Common Mistakes to Avoid
- Setting unrealistic deadlines that pressure annotators
- Providing vague or incomplete labeling instructions
- Setting quality requirements too high or too low
- Not accounting for review time in project timelines
- Underestimating the complexity of annotation tasks
- Setting batch sizes that don't match task complexity
Troubleshooting
If you encounter issues during project creation:
- Required fields not saving: Ensure all mandatory fields are filled
- File upload errors: Check file format and size limitations
- Date validation errors: Verify start date is before end date
- Configuration conflicts: Review settings for logical consistency
For additional support, refer to the system documentation or contact your administrator.