Labels Management
Labels are essential components in any annotation project, allowing you to categorize and classify objects, regions, or entire images based on your project requirements. The Labels Management feature provides a comprehensive interface for creating, organizing, and managing labels throughout your project lifecycle.
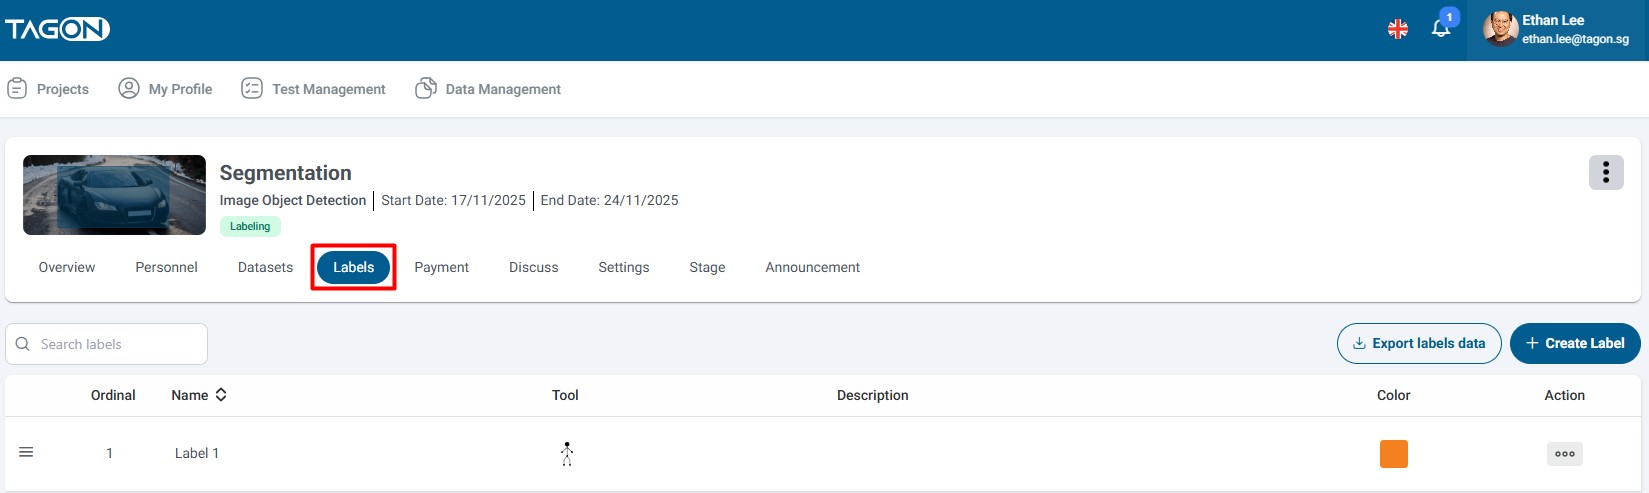
Accessing Labels Management
To access the Labels Management interface:
- Navigate to the Project List screen
- Click on Project Details for the project you want to manage
- Click on the Labels tab
- The Labels Management screen will be displayed
Overview
The Labels tab provides two primary methods for adding labels to your project:
Add One Label: Create individual labels with detailed configurations, suitable for object detection, segmentation, and annotation tasks
Add Multiple Labels: Quickly create multiple labels at once, ideal for image classification and categorization projects
Add One Label
The "Add One Label" feature is designed for projects that require detailed object annotation, such as object detection, semantic segmentation, or instance segmentation. This method allows you to create labels with comprehensive configurations including tool types, colors, descriptions, and custom attributes.
How to Add One Label
- On the Labels tab, click the Add One Label button
- The Add Label dialog will appear
- Fill in all the required information to configure your label
- Click Save to create the label, or Cancel to discard your changes

Label Configuration Fields
When creating a label, you need to configure the following fields:
Label Name
- Purpose: Identifies the label uniquely within your project
- Requirements: Must be unique within the project and should follow your project's naming conventions
Use clear, descriptive names that correspond to the objects or categories you're annotating (e.g., "Person", "Car", "Traffic Sign", "Building")
Tool Type
- Purpose: Determines the annotation tool that will be used when applying this label
- Available Options:
- POLYGON: For irregular shapes and precise boundaries (e.g., object segmentation, land parcel mapping)
- RECT: For rectangular bounding boxes (e.g., object detection, document regions)
- KEY_POINTS: For marking specific points of interest (e.g., facial landmarks, pose estimation, key object points)
- POLYLINE: For drawing lines and paths (e.g., road markings, boundaries, trajectories)
- POINTS: For marking individual points (e.g., location markers, interest points)
- CUBOID: For 3D bounding boxes (e.g., 3D object detection, spatial annotation)
- ALL: Allows the label to be used with any tool type, providing maximum flexibility
- Selection: Choose the tool type that best matches your annotation requirements and project goals
Label Color
- Purpose: Visual identification of labels during annotation and review
- Usage: Each label should have a distinct color to make it easily distinguishable from other labels
- Selection: Click the color picker to choose a color that suits your project's visual requirements
Use contrasting colors for labels that are likely to appear together in the same image
Description
- Purpose: Provides additional context and information about the label
- Content: Include details such as:
- What the label represents
- When to use this label
- Any specific annotation guidelines
- Edge cases or special considerations
Write clear, concise descriptions that help annotators understand when and how to use the label
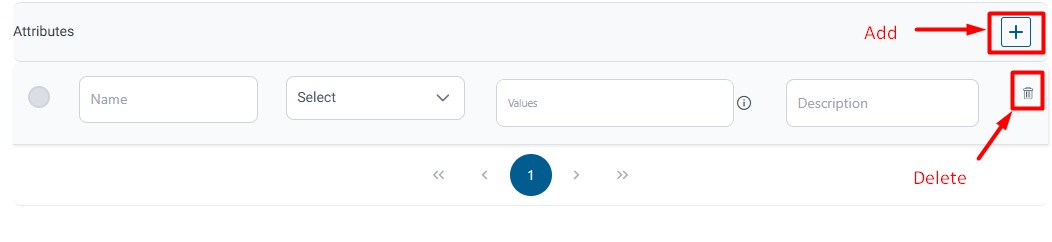
Attributes
Attributes allow you to add custom metadata and additional classification options to your labels. This is particularly useful for projects that require detailed information beyond simple categorization.
Adding Attributes:
- Click the Add Attribute button (or similar control)
- Configure the following fields for each attribute:
- Name: A descriptive name for the attribute (e.g., "Vehicle Type", "Weather Condition", "Quality")
- Attribute Type: Choose from the following options:
- Text: Free-form text input for descriptive information
- Select: Dropdown menu with predefined options (single selection)
- Number: Numeric input for quantitative data
- Checkbox: Boolean true/false or yes/no options
- Radio: Single selection from multiple predefined options
- Value:
- For Select and Radio types: Enter the available options (one per line or comma-separated)
- For Text and Number: Define default values or validation rules if applicable
- For Checkbox: Typically doesn't require values as it's a boolean field
- Description: Explain what this attribute represents and how it should be used
- You can add multiple attributes to a single label
- To remove an attribute, click the delete icon next to it
Vehicle Annotation:
- "Vehicle Type" (Select: Car, Truck, Motorcycle)
- "Color" (Text)
- "License Plate" (Text)
Quality Assessment:
- "Quality" (Select: High, Medium, Low)
- "Visibility" (Number: 1-10)
Weather Classification:
- "Weather Condition" (Radio: Sunny, Cloudy, Rainy, Snowy)
- "Visibility" (Checkbox: Good/Poor)
Saving the Label
After configuring all the label fields:
- Click Save to create the new label and add it to your project
- Click Cancel to discard all changes and return to the Labels Management screen
Once saved, the label will be immediately available for use in your annotation tasks. You can edit or delete labels later if needed.
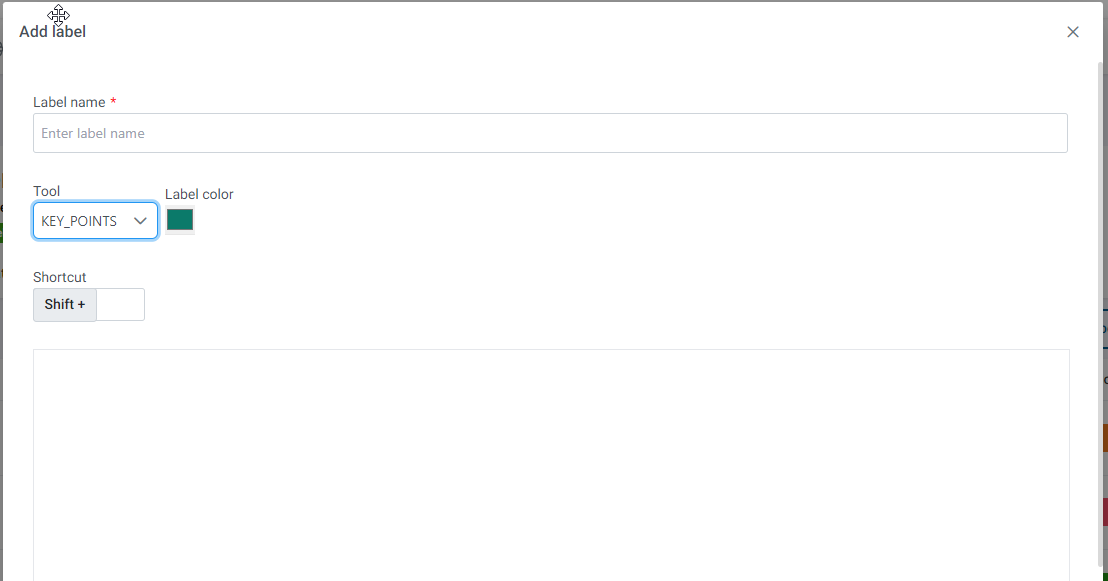
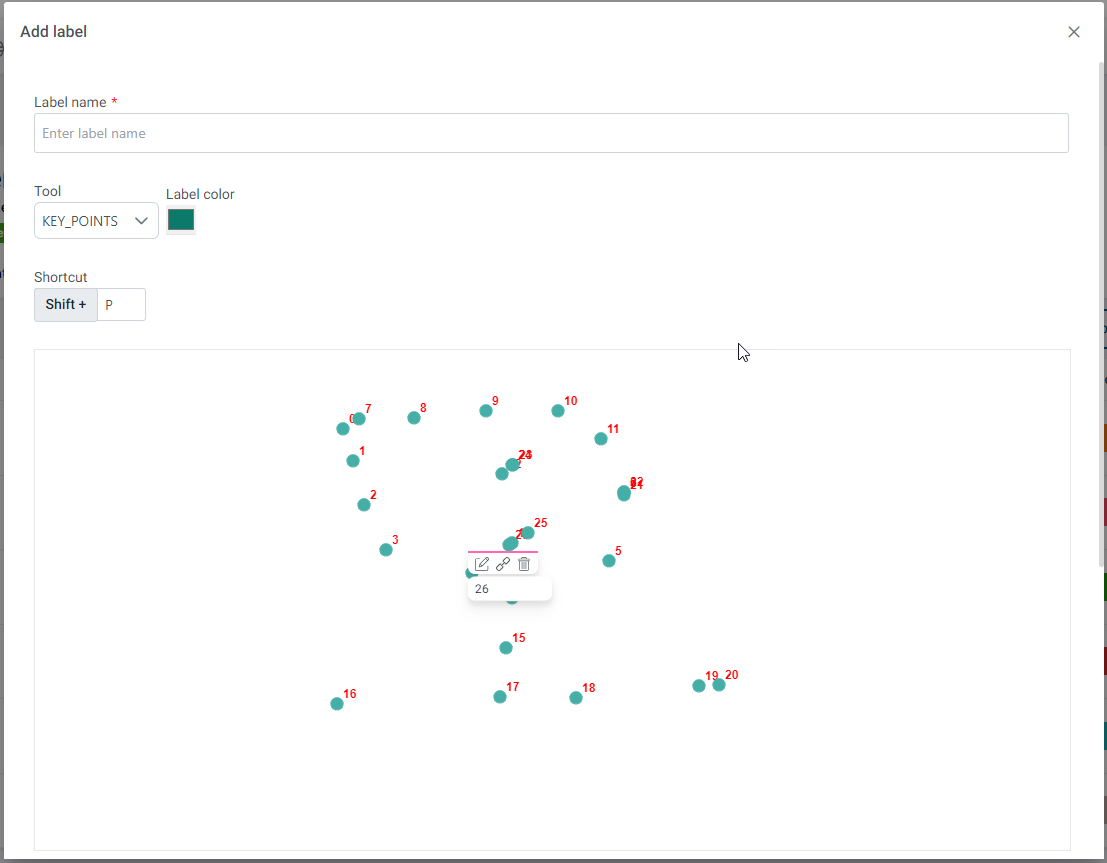
Key_Points Tool - Special Configuration
The Key_Points tool is specifically designed for projects that require precise point-based annotation, such as facial landmark detection, pose estimation, object keypoint detection, or any task that involves marking specific points of interest on objects.
Setting Up Key_Points Labels
- In the Add Label dialog, select Key_Points from the Tool Type dropdown
- The interface will display additional configuration options specific to keypoint annotation
- Configure the keypoint structure according to your project requirements
Defining Keypoints
When using the Key_Points tool, you need to define the structure of keypoints that will be used for annotation:
- Marking Points: Click on the canvas or use the point definition interface to mark the keypoints required for your task
- Point Configuration: Each point can be configured with:
- Point Name: A descriptive name for the keypoint (e.g., "Left Eye", "Nose Tip", "Right Shoulder", "Left Knee")
- Point Position: The coordinates or relative position of the point
- Point Connections: Define which points should be connected to form a skeleton or structure
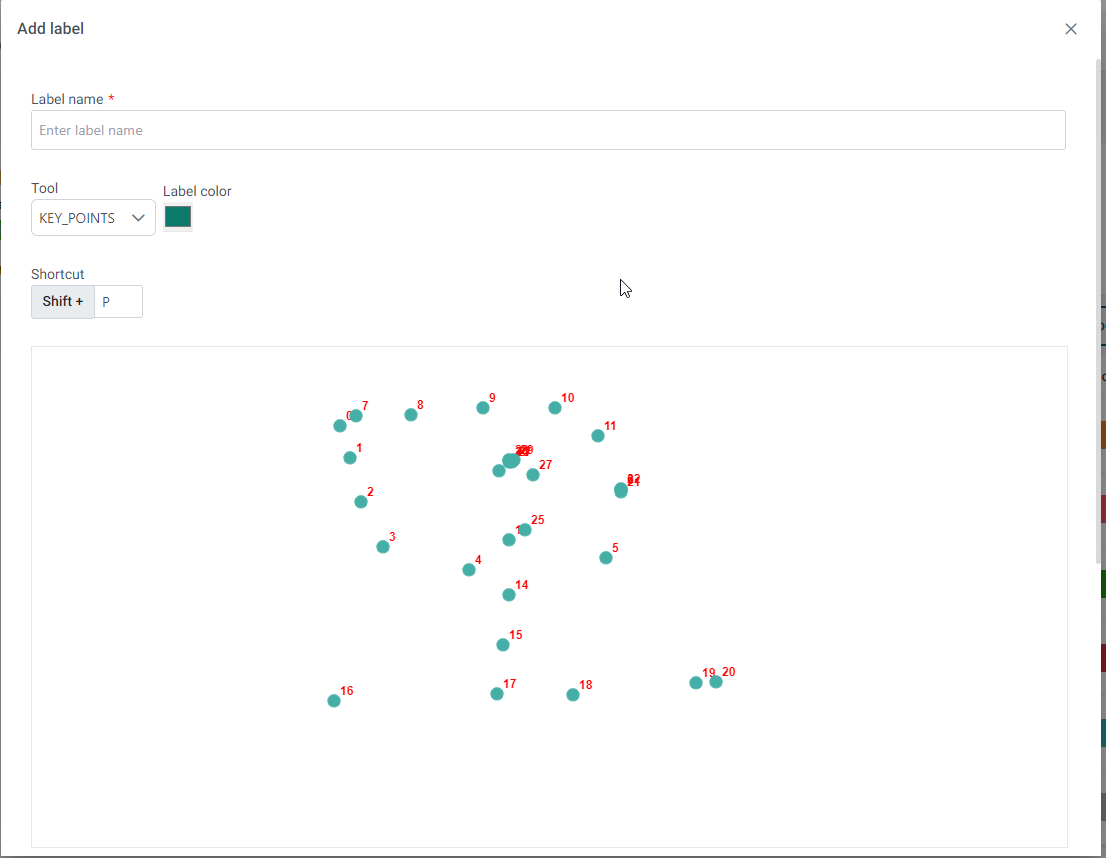
Editing Keypoints
After creating keypoints, you can edit them using the right-click context menu:
Right-click on any point to access the following options:
-
Connect Points:
- Create connections between keypoints to form a skeleton or structure
- Useful for pose estimation, facial landmarks, or object structure visualization
- Select multiple points to create connections between them
- Connections help annotators understand the relationship between keypoints
-
Edit Point Name:
- Rename the keypoint to better reflect its purpose
- Use descriptive names that match your project's terminology
- This helps maintain consistency across annotations
-
Delete Point:
- Remove a keypoint that is no longer needed
Use with caution as this may affect existing annotations using this label
Best Practices for Key_Points
- Consistent Naming: Use a consistent naming convention for keypoints (e.g., "Left/Right" prefixes, anatomical terms)
- Logical Connections: Connect points in a way that makes sense for your use case (e.g., connect joints in pose estimation)
- Point Order: Consider the order in which points should be marked during annotation
- Documentation: Provide clear descriptions of what each keypoint represents and where it should be placed
Other Configuration Fields
All other fields (Label Name, Label Color, Description, Attributes) work the same way as with other tool types. You can still:
- Set a descriptive label name
- Choose a distinct color for visual identification
- Add a detailed description explaining the keypoint structure
- Configure custom attributes if needed
The Key_Points tool is particularly useful for computer vision tasks involving human pose estimation, facial recognition, object part detection, and any annotation task that requires precise point-level annotation.
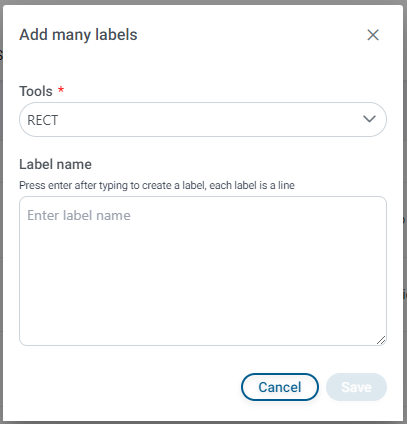
Add Multiple Labels
The "Add Multiple Labels" feature is optimized for projects that require simple categorization, such as image classification, content categorization, or any task where labels don't need complex configurations. This method allows you to quickly create multiple labels at once without configuring tool types, colors, or attributes individually.
When to Use Add Multiple Labels
This feature is ideal for:
- Image Classification Projects: Where entire images are categorized into classes
- Content Categorization: Sorting content into predefined categories
- Simple Tagging Systems: Projects that only need label names without additional metadata
- Bulk Label Creation: When you need to create many labels quickly with minimal configuration
How to Add Multiple Labels
- On the Labels tab, click the Add Multiple Labels button
- The Add Multiple Labels screen will be displayed
- Enter label names in the input field
- Press Enter after each label name to add it to the list
- Continue adding labels until you've entered all required labels
- Review your labels list
- Click Save to create all labels, or Cancel to discard the operation
Adding Labels
Step-by-Step Process:
- Enter Label Name: Type the name of the first label in the input field
- Press Enter: Press the Enter key to add the label to the list and clear the input field
- Repeat: Continue entering label names and pressing Enter for each additional label
- Review: Check the list of labels you've created before saving
- Edit if Needed: You can typically remove labels from the list before saving if you make a mistake
Example Workflow:
Enter: "Cat" → Press Enter
Enter: "Dog" → Press Enter
Enter: "Bird" → Press Enter
Enter: "Fish" → Press Enter
→ List shows: Cat, Dog, Bird, Fish
→ Click Save to create all labels
Label Naming Guidelines
When adding multiple labels, follow these guidelines:
- Clear and Descriptive: Use names that clearly identify the category or class
- Consistent Format: Maintain consistent naming conventions (e.g., all singular, all plural, or all capitalized)
- No Duplicates: Ensure each label name is unique within your project
- Appropriate Length: Keep names concise but descriptive (typically 1-3 words)
Saving Multiple Labels
- Save: Click the Save button to create all labels in the list. All labels will be created simultaneously and added to your project.
- Cancel: Click Cancel to discard all entered labels and return to the Labels Management screen without creating any labels.
After saving, all labels will be immediately available for use in your annotation tasks. Labels created through this method will have default configurations (typically a default tool type and auto-assigned colors). You can edit these labels later to add descriptions, change colors, or configure attributes if needed.
Labels Management Interface
After successfully creating labels, they will be displayed in a table format on the Labels tab. This interface provides a comprehensive view of all labels in your project and allows you to manage them effectively.
Labels Table Columns
The labels table displays the following information for each label:
- No.: Sequential number indicating the order of labels (useful for reference and organization)
- Name: The label name as defined during creation
- Description: The description text you provided (if any)
- Tool Type: The annotation tool type associated with the label (POLYGON, RECT, KEY_POINTS, etc.)
- Color: Visual color indicator showing the label's assigned color
- Actions: Action buttons for managing individual labels (Edit, Delete, etc.)
Labels Statistics
The Labels tab displays statistics at the top of the interface showing:
- Total Number of Labels: The count of all labels created in the project
- Labels by Tool Type: Breakdown of labels by their tool types (if available)
- Active Labels: Number of labels currently in use
These statistics help you:
- Track the scale of your labeling system
- Understand the distribution of tool types in your project
- Monitor label usage and organization
Managing Labels
The Labels Management interface provides several actions for managing your labels:
Searching Labels
When to Use: When your project contains many labels, finding a specific label can be challenging.
How to Search:
- Locate the search field (typically at the top of the labels table)
- Enter the label name (or part of the name) you want to find
- The table will filter in real-time to show only matching labels
- The search is typically case-insensitive and supports partial matches
- You can search by any part of the label name
- The search updates automatically as you type
- Clear the search field to show all labels again
- Search helps you quickly locate labels in large projects
Editing Labels
When to Use:
- Correct mistakes in label configuration
- Update label descriptions or attributes
- Change tool types or colors
- Modify keypoint structures
How to Edit:
- Locate the label you want to edit in the labels table
- Click the Edit icon (typically a pencil or edit symbol) in the Actions column
- The Edit Label dialog will open with the current label configuration
- Modify the fields you want to change:
- Update the label name
- Change the tool type (if needed)
- Modify the color
- Edit the description
- Add, modify, or remove attributes
- For Key_Points labels: Edit keypoint structure
- Click Save to apply changes, or Cancel to discard modifications
- Editing a label affects all existing annotations using that label
- Be cautious when changing tool types, as this may impact existing annotations
- Label name changes should be communicated to your annotation team
- Some changes may require re-annotation if they affect the annotation structure
Deleting Labels
When to Use:
- Remove labels that are no longer needed
- Clean up incorrectly created labels
- Remove duplicate or redundant labels
How to Delete:
- Locate the label you want to delete in the labels table
- Click the Delete icon (typically a trash can or delete symbol) in the Actions column
- A confirmation dialog will typically appear to prevent accidental deletion
- Confirm the deletion to permanently remove the label
- Deleting a label may affect existing annotations that use this label
- Some systems may prevent deletion if the label is actively used in annotations
- Consider the impact on your project before deleting labels
- It's often safer to disable or hide labels rather than delete them if they're in use
- Always backup your project before performing bulk deletions
Best Practices for Labels Management
- Organize Labels Logically: Group related labels together using consistent naming conventions
- Use Descriptive Names: Choose clear, unambiguous label names that reflect their purpose
- Maintain Consistency: Keep naming conventions, colors, and structures consistent across similar labels
- Document Your Labels: Use descriptions to explain when and how to use each label
- Regular Review: Periodically review your labels to remove unused ones and consolidate similar labels
- Color Coordination: Use distinct colors for labels that may appear together in the same image
- Version Control: Keep track of label changes, especially in collaborative projects
- Test Before Bulk Changes: Test label modifications on a small subset before applying to the entire project
Troubleshooting
Can't find a label: Use the search function to locate it by name
Too many labels to manage: Consider organizing labels into categories or using a hierarchical structure if supported
Label color conflicts: Review and adjust colors to ensure sufficient contrast
Can't delete a label: The label may be in use; check existing annotations or contact your administrator
Labels not appearing: Refresh the page or check if filters are applied