Datasets Management
The Datasets Management screen is a centralized dashboard for managing all your organization's datasets. This comprehensive guide will help you understand how to access, create, and manage datasets effectively on the TagOn platform.
1. Overview: Purpose of Datasets Management
The Datasets Management screen serves as the central hub for all data-related operations in your organization. It provides a unified view of your data inventory and enables efficient dataset administration.
Key Features
-
Comprehensive Overview: Aggregates every dataset across your organization, presenting key metadata including:
- Creation date and timestamps
- Total file count per dataset
- Data type classification
-
Single Source of Truth: Serves as the authoritative source for data inventory and readiness status across all projects
-
Centralized Management: Enables administrators to manage datasets from a single location without navigating between multiple projects
User Roles & Permissions
Access to the Datasets Management screen is restricted based on user roles within your organization. Understanding these permissions helps ensure proper data governance and security.
Leaders / Administrators
Users with leader or administrator roles have administrative access to the Datasets Management screen and all its features.
Available Permissions:
-
Create Datasets
- Can create new datasets from scratch
- Full access to dataset creation form and all configuration options
- Can set initial properties during creation
-
Delete Datasets
- Can permanently remove datasets from the system
- Deletion triggers automatic cost refunds where applicable
- Should be used with caution as deletion may be irreversible
- System may require confirmation for datasets with active work items
-
Full Management Access
- Complete access to all dataset management features
- Can view all datasets across the organization
- Can manage dataset ownership and assignments
- Can access advanced administrative functions
Responsibilities:
- Ensure proper dataset organization and naming conventions
- Manage dataset lifecycle (creation, maintenance, archival, deletion)
- Monitor dataset usage and costs
Primary Actions Available
-
Inspect Dataset Details
- Click any dataset tile to open a detailed view
- View comprehensive statistics and metadata
-
Upload New Data
- Upload files to existing datasets
- Create new datasets and upload data simultaneously
- Access upload functionality from dataset detail pages
2. Accessing the Datasets Management Screen
Follow these steps to access the Datasets Management screen:
Step 1: Log In to TagOn
- Navigate to the TagOn platform login page
- Enter your credentials
- Click Login to access your account
Step 2: Navigate to Data Management
- Once logged in, look at the toolbar
- Click on Data Management
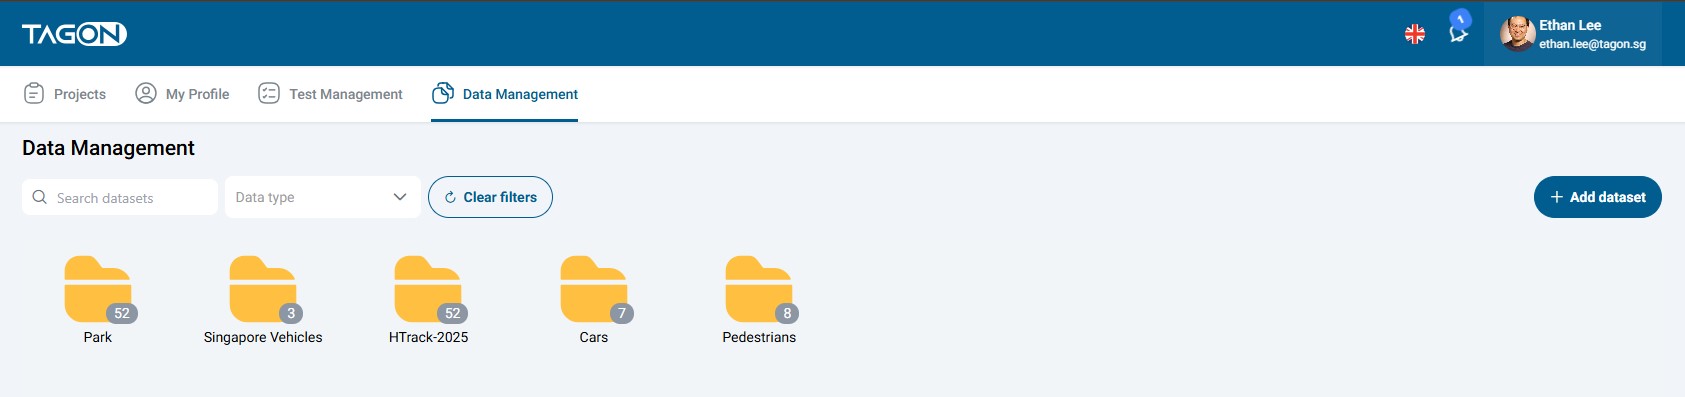
Step 3: View Datasets Management Screen
After clicking Data Management, the system will redirect you to the Datasets Management screen, which displays:
- Grid Layout: All existing datasets displayed in a visual grid
- Dataset Tiles: Each dataset represented as a tile with key information
- Search and Filters: Tools to find and filter datasets
- Action Buttons: Quick access to common operations
If this is your first time accessing Data Management, you may see an empty screen. This is normal—simply follow the steps in the next section to create a dataset.
3. Understanding the Interface Elements
The Datasets Management screen contains several key interface elements designed to help you efficiently manage your datasets.
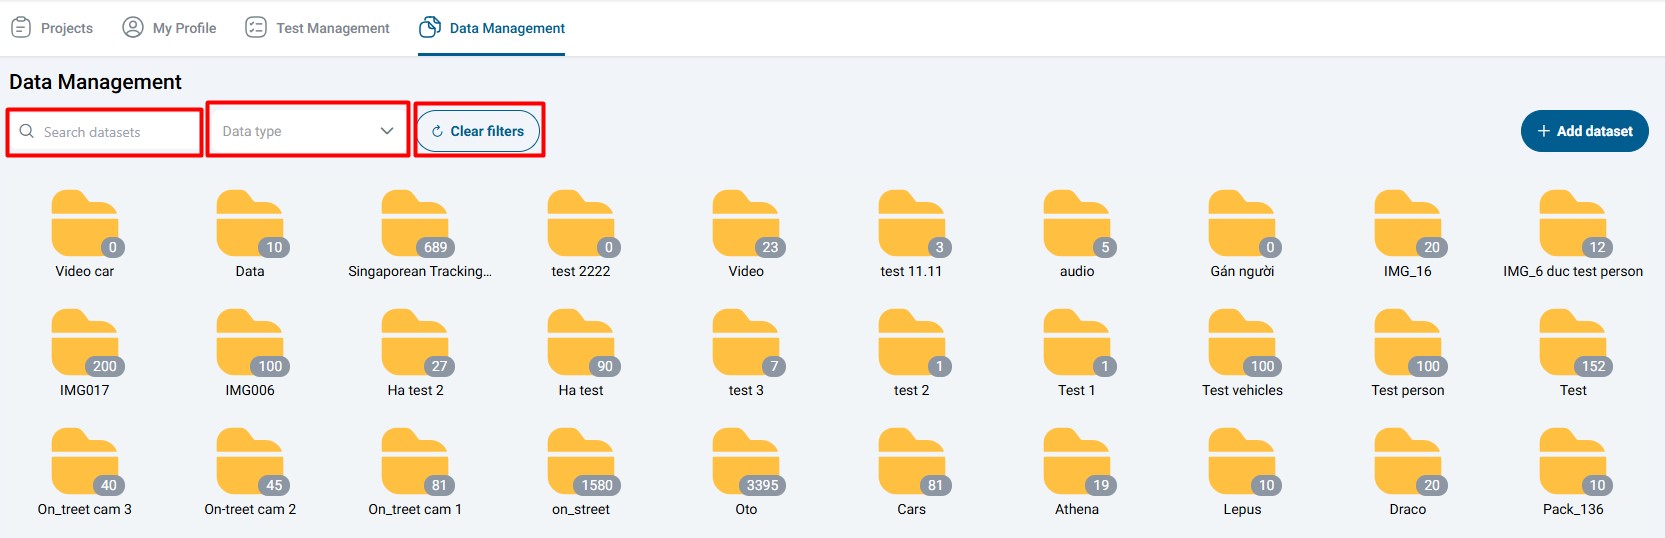
Search Datasets
Functionality:
- Responsive Search Bar: Real-time search as you type
- Fuzzy Matching: Supports partial name matching, so you don't need exact matches
- Multiple Search Criteria: Search by:
- Dataset names (partial or full)
- Type
How to Use:
- Click in the search bar
- Type any part of the dataset name, tag, or ID
- Results filter automatically as you type
- Clear the search to restore the full list
Data Type Filter
Functionality:
- Toggle Buttons: Click to filter by specific data types
- Available Filters:
- Image: Static pictures (JPEG, PNG, GIF, etc.)
- Video: Video files (MP4, MOV, AVI, etc.)
- Audio: Sound recordings (WAV, MP3, etc.)
- Text: Plain text or JSON documents
- Other: Additional data types as supported
Benefits:
- Reduces visual clutter by showing only relevant datasets
- Helps organize large numbers of datasets
- Enables quick access to datasets of specific types
How to Use:
- Click the data type button you want to filter by
- The grid updates to show only datasets of that type
- Click the button again to deselect and show all types
- Multiple filters can be active simultaneously
Clear Filters Button
Functionality:
- One-Click Reset: Instantly clears all active filters
- Restore Full View: Returns to showing all datasets
- Reset Search: Also clears any active search queries
When to Use:
- When you want to see all datasets again
- After applying multiple filters
- When search results are too narrow
4. Creating a New Dataset
Creating a new dataset is a straightforward process that takes just a few steps. Follow this detailed guide to create your first dataset or add additional datasets to your organization.
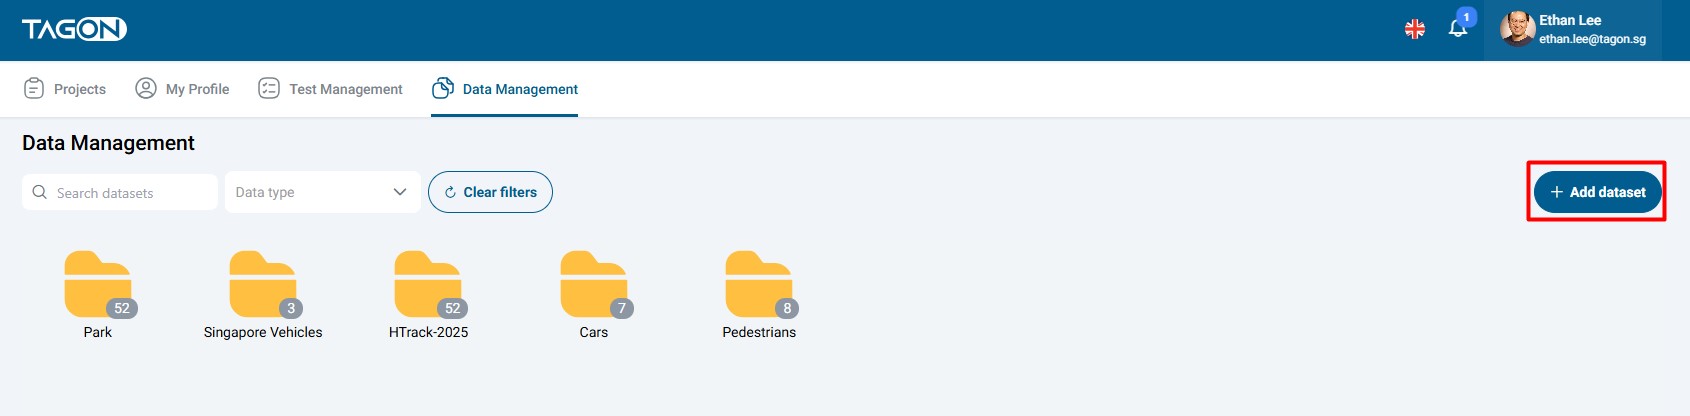
Step 1: Locate the Creation Button
- Navigate to the Datasets Management screen (see Section 2 for access instructions)
- Look at the top-right corner of the screen
- Find the prominent blue button labeled + Add dataset
- This button is always visible when you have permission to create datasets
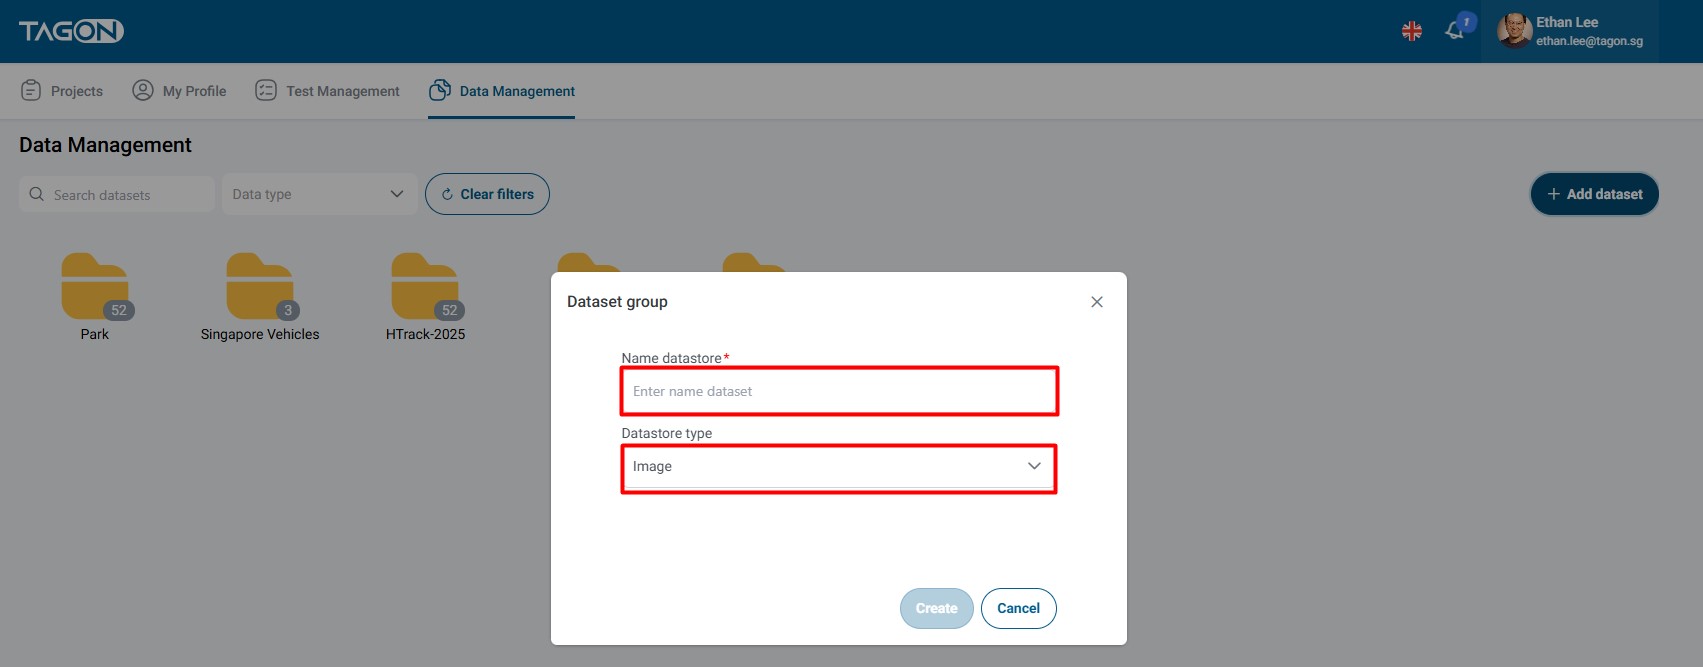
Step 2: Fill in the Dataset Creation Form
After clicking + Add dataset, a modal form will appear. Fill in the required information:
Required Fields
Name datastore* (Required)
- Purpose: Identifies your dataset uniquely within the system
- Naming Guidelines:
- Use concise, descriptive names
- Example:
Vehicle_Images_Jan2025 - Include relevant information like:
- Content type (e.g., "Vehicle", "Street", "Indoor")
- Date or version (e.g., "Jan2025", "v1.0")
- Project identifier if applicable
- select database type
Step 3: Create the Dataset
After filling in the form:
-
Review Your Entries: Double-check that:
- Dataset name is correct and descriptive
- Data type matches your intended content
-
Click the Create Button:
- The button is typically light-blue in color
- Located at the bottom of the modal form
- May be labeled "Create", "Create Dataset", or "Save"
-
Initial State:
- The detail page will display "No data set" or similar message
- This is normal—the dataset is created but empty
- You'll need to upload files to populate the dataset
-
Click Cancel if you want to cancel the action

Dataset creation is typically instantaneous. The dataset is immediately available for use, though it will be empty until you upload files.
5. Next Steps After Creating a Dataset
Once you've created a dataset, there are several important next steps to make it ready for use in your projects.
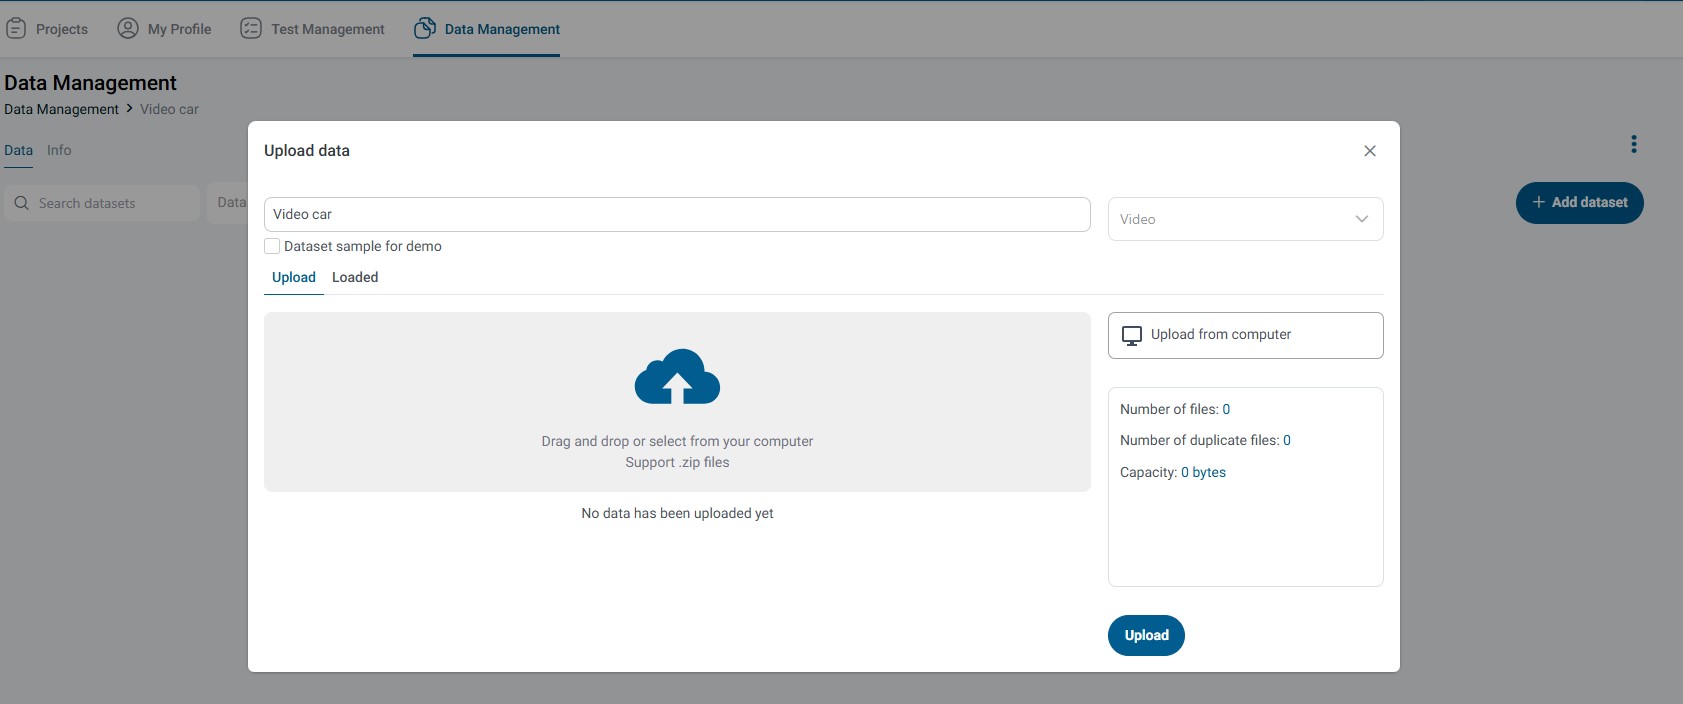
Step 1: Add Data to the Dataset
The most immediate next step is to populate your newly created dataset with files.
How to Add Data:
-
From Dataset Detail Page:
- You'll be automatically redirected here after creation
- Click on the button

- Click it to open the file upload interface
-
Upload Process:
- Select files from your local system
- Choose files that match the dataset type you selected
- Upload can handle single or multiple files
- Progress indicators show upload status
-
Verification:
- Wait for upload confirmation
- Check that file counts match your expectations
- Verify files are correctly associated with the dataset
Step 2: Add to Projects
Once your dataset has data:
- Navigate to Project: Go to the project where you want to use the dataset
- Add Dataset: Use the "Add dataset to project" feature
- Verify Integration: Confirm the dataset appears in the project's data section
For detailed instructions on adding datasets to projects, refer to the Add Dataset to Project guide.
6. Quick Reference Guide
For Leaders/Admins: One-Line Summary
Complete Workflow:
Log in → Data Management → + Add dataset → Enter name & select type → Create → + Add data → Upload → Done!
Time Estimate: Approximately 2-3 minutes to create and populate a dataset
Best Practices
- Naming Convention: Use consistent, descriptive names across all datasets
- Organization: Group related datasets using tags or naming patterns
- Documentation: Add descriptions to help team members understand dataset purposes
- Access Control: Set appropriate permissions from the start
- Regular Review: Periodically review and archive unused datasets
7. Troubleshooting
Issue: Cannot See "+ Add dataset" Button
Possible Causes:
- Insufficient permissions (not an admin or leader)
- Browser display issues
- Screen size/resolution problems
Solutions:
- Contact your administrator to request dataset creation permissions
- Try refreshing the page
- Check if you're logged in with the correct account
- Try a different browser
Issue: Dataset Creation Fails
Possible Causes:
- Network connectivity issues
- System maintenance
Solutions:
- Check dataset name follows naming guidelines
- Verify your internet connection
- Try again after a few minutes
- Contact support if problem persists
Issue: Cannot Upload Files After Creation
Possible Causes:
- File format doesn't match dataset type
- Browser compatibility issues
Solutions:
- Verify file formats match the selected dataset type
- Try uploading from dataset detail page
- Use a different browser if issues persist
Summary
The Datasets Management screen is your central hub for all data operations. Key points to remember:
- Access: Navigate through Resources → Data Management
- Create: Use + Add dataset button in top-right corner
- Configure: Set name, type, and optional settings
- Populate: Add data files to make datasets usable
- Manage: Organize, filter, and search datasets efficiently
Remember: A well-organized dataset structure makes project management much easier. Take time to establish good naming conventions and organizational practices from the start.
Good luck creating datasets quickly and keeping your projects running smoothly!